Table of Contents
Keeping your K&N cabin air filter clean is essential. It ensures fresh air inside your car.
The K&N cabin air filter traps dust, pollen, and other pollutants. Over time, these particles build up, reducing the filter’s effectiveness. A dirty filter can also affect your car’s air quality and performance. Cleaning it regularly is crucial for maintaining a healthy environment inside your vehicle.
This guide will show you how to clean your K&N cabin air filter step-by-step. Follow these simple instructions to ensure your filter works efficiently and lasts longer. Ready to breathe easier? Let’s get started!
Tools And Materials Needed
Cleaning your K&N cabin air filter keeps your car’s air fresh and clean. To do this, you need the right tools and materials. This will ensure a thorough and effective cleaning process.
Required Cleaning Kit
The K&N cabin air filter cleaning kit is essential. It includes a cleaner solution and oil. The cleaner solution removes dirt and grime. The oil helps to restore the filter’s efficiency.
Make sure to use the specific K&N kit for best results. This kit is designed to work with your filter. Using other products may not give the same results.
Additional Tools
Besides the cleaning kit, you need a few more items. A clean bucket is useful for soaking the filter. You also need a soft brush for scrubbing.
Clean water is necessary for rinsing the filter. Ensure the water is not too hot or cold. Lukewarm water works best.
Finally, have a clean, dry towel ready. You will use this to dry the filter after cleaning. Ensure the towel is lint-free to avoid leaving fibers on the filter.
Preparation Steps
Cleaning your K&N Cabin Air Filter requires some preparation. Following the correct steps ensures the process is smooth and effective. This section will guide you through the necessary preparation steps, focusing on safety and filter removal.
Safety Precautions
Before you start, ensure your vehicle is off. Disconnect the battery to avoid any electrical issues. Wear gloves and safety glasses to protect your hands and eyes. Make sure you work in a well-ventilated area. This helps avoid inhaling any dust or fumes.
Removing The Filter
Locate the cabin air filter housing. This is usually behind the glove box or under the hood. Consult your vehicle’s manual for the exact location. Open the housing cover carefully. Some models may have screws or clips. Remove these with the appropriate tools. Take out the old filter gently. Avoid shaking it to prevent dust from spreading.
Cleaning The Filter
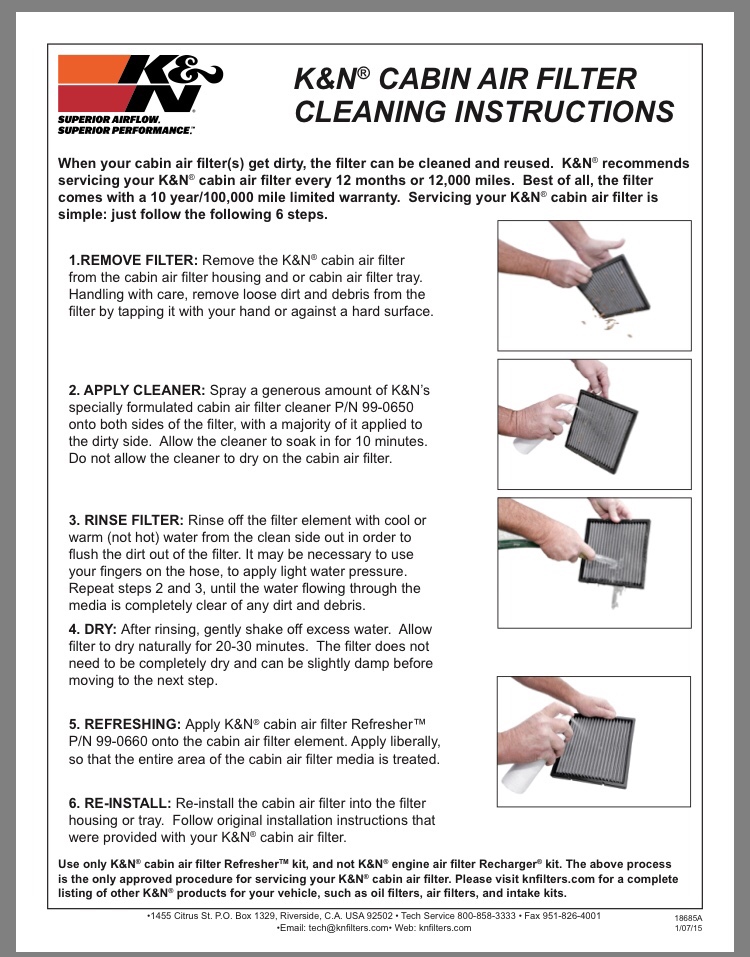
Keeping your K&N cabin air filter clean is essential for maintaining air quality inside your vehicle. Regular cleaning ensures that the filter works efficiently. This guide will show you how to clean your K&N cabin air filter properly. Follow these steps for a cleaner, healthier environment inside your car.
Applying Cleaning Solution
First, remove the filter from your vehicle. Shake off loose debris. Next, apply the K&N cabin air filter cleaning solution. Spray the solution generously on both sides of the filter. Ensure that the solution covers all parts of the filter. Let the cleaning solution sit for 10 minutes. This helps break down dirt and contaminants.
Rinsing The Filter
After the solution has sat, rinse the filter with cool, low-pressure water. Rinse from the clean side to the dirty side. This prevents contaminants from embedding deeper into the filter. Continue rinsing until the water runs clear. Avoid using high-pressure water as it can damage the filter.
Shake off excess water. Allow the filter to dry naturally. Place it in a well-ventilated area. Do not use heat to speed up drying. Heat can damage the filter material. Once the filter is completely dry, it is ready to be reinstalled in your vehicle.
Drying The Filter
Drying your K&N cabin air filter is an essential step. A properly dried filter ensures your vehicle’s HVAC system works efficiently. Below are some tips on how to dry the filter properly.
Air Drying Tips
After washing the filter, shake off any excess water. Place the filter in a well-ventilated area. It’s best to set it on a clean, dry surface. Make sure the area has good airflow. This will help the filter dry faster.
To speed up the drying process, you can use a fan. Position the fan so that air flows through the filter. This helps remove water trapped in the pleats. Avoid using a high-speed setting to prevent damage.
Avoiding Heat Sources
Never use heat sources like ovens or hair dryers. High temperatures can damage the filter material. This can reduce its efficiency and lifespan. Direct sunlight should also be avoided. UV rays can degrade the filter over time.
Ensure the filter is completely dry before reinstalling. Any leftover moisture can cause mold and mildew. This can lead to unpleasant odors and potential health issues. Patience is key for a properly dried filter.
Re-oiling The Filter
Re-oil the K&N cabin air filter after cleaning it thoroughly. Spread the oil evenly on the filter surface. This ensures optimal performance and longevity.
Re-oiling your K&N cabin air filter is an important step. It ensures that the filter works efficiently. Proper oiling helps trap dust and other particles. Follow these steps for best results.
Proper Oiling Technique
Use the K&N cabin air filter oil. Spray the oil evenly on the filter. Hold the nozzle about 3 inches away. Apply the oil in a sweeping motion. Cover the entire surface.
Ensuring Even Coverage
Check the filter after spraying. Look for any dry spots. If you find dry areas, apply more oil. Make sure the oil is evenly spread. Let the filter sit for a few minutes. This allows the oil to soak in.
Recheck the filter. Ensure no spots are missed. Proper oiling keeps your cabin air clean. It also extends the life of the filter.
“`
Reinstalling The Filter
Reinstalling your K&N cabin air filter is an important step. After cleaning and drying, you want to ensure it fits properly. This guide will help you secure and check the filter for a proper fit.
Securing The Filter
First, place the clean and dry filter back into its housing. Make sure it aligns with the grooves. This helps prevent air leaks and ensures optimal performance.
- Align the edges of the filter with the housing frame.
- Press down gently but firmly to secure it in place.
- Check for any gaps around the edges.
After securing, ensure the filter sits flat. No part should be raised or misaligned.
Checking For Proper Fit
Next, check the filter’s fit to ensure it is installed correctly. This ensures the filter will work efficiently.
- Run your hand along the edges of the filter.
- Feel for any uneven spots or gaps.
- If you find any, adjust the filter until it sits evenly.
A properly fitted filter will stay in place and provide clean air. Avoid forcing the filter into place as this can damage it.
Maintenance Tips
Maintaining a K&N cabin air filter ensures clean air inside your vehicle. Regular maintenance keeps the filter effective, extending its lifespan. Let’s explore some essential maintenance tips.
Regular Cleaning Schedule
Establishing a regular cleaning schedule is key. Clean the filter every 12,000 to 15,000 miles. This routine helps keep the air in your car fresh and healthy.
Check your vehicle’s manual for specific recommendations. Sticking to a schedule prevents buildup of dust and debris. A clean filter improves air flow and overall air quality.
Signs Of A Dirty Filter
Look for these signs to know if the filter needs cleaning. Reduced airflow from the vents is a common indicator. Musty or unpleasant smells inside the car also signal a dirty filter.
If you or passengers experience allergies or respiratory issues, check the filter. Dirty filters can trap pollen and other allergens. Regular inspection helps maintain a healthy environment in your vehicle.
Frequently Asked Questions
How Often Should I Clean My K&n Cabin Air Filter?
Clean your K&N cabin air filter every 12,000 to 15,000 miles or once a year.
What Tools Do I Need To Clean A K&n Cabin Air Filter?
You need the K&N Recharger Kit, which includes a cleaner and oil, and a soft brush.
Can I Use Soap And Water To Clean My K&n Cabin Air Filter?
No, use only the K&N cleaner. Soap and water can damage the filter material.
How Long Does It Take To Clean A K&n Cabin Air Filter?
Cleaning and drying a K&N cabin air filter takes about 2 to 3 hours.
Why Is Cleaning My K&n Cabin Air Filter Important?
Cleaning ensures optimal airflow and performance. It also extends the lifespan of your filter.
Conclusion
Cleaning your K&N cabin air filter is simple and effective. Regular maintenance ensures better air quality in your vehicle. Follow the steps outlined to keep your filter in top condition. It saves money and keeps your car running efficiently. Clean filters improve airflow and reduce allergens.
Make it a routine task. Your car and health will thank you. Happy driving with a clean cabin air filter!