
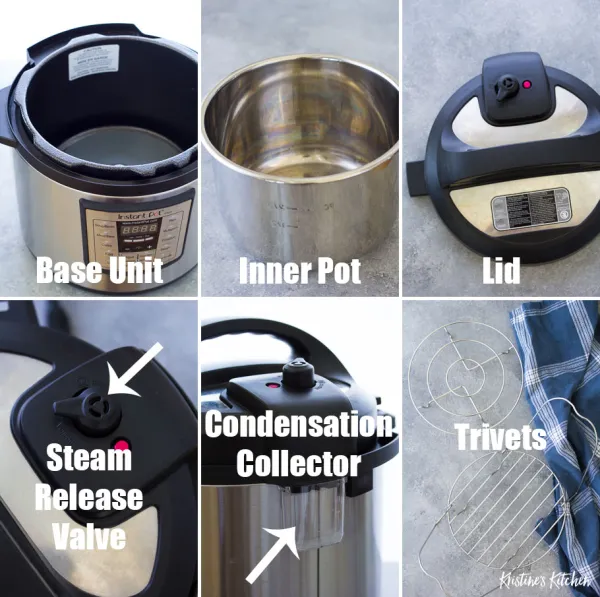
You crack the lid of your Instant Pot, ready to scoop out a perfect stew, and instead you catch a whiff of last week’s curry. Or maybe that dreaded Burnerror flashes on the screen.
Here’s the thing – you’re not alone, it’s a sign that hidden grime. Actually, that’s not quite right, has built up in places you didn’t know existed. More importantly, most cleaning guides skip over the tiny crumb — well, actually, trench and the silicone ring that acts like a flavor sponge. In one recent Reddit thread, a user admitted they’d owned their Instant Pot for two years. Context matters here. Before discovering the anti-block shield could be removed. The evidence is there. Context matters here.
That’s exactly why a proper deep clean is about more than just scrubbing the inner pot. Yes, you can get it factory-fresh again without buying a new $100 unit.
TL; DR
- The crumb trench, anti-block shield, and silicone sealing ring harbor invisible food gunk that ruins flavor and can cause a burn error—clean them after every 2–3 uses.
- Rainbow stains or white mineral deposits on the stainless inner pot are harmless but easily removed with Bar Keepers Friend and a soft cloth.
- The condensation collector cup on the back of the cooker grows mold if you forget it; empty and wash it weekly.
Key Point
- The sealing ring is the #1 odor culprit—freeze it overnight or steam it with 1 cup water, 1 cup vinegar, and lemon peels for 5 minutes.
- A butter knife wrapped in a damp microfiber cloth cleans the deep rim around the base better than any specialty brush.
- If the steam release valve gets sticky, pop off the handle and scrub the tiny hidden channel—most people overlook it.
What You’ll Need
Before you start, gather a few household items, the entire process takes about 30 minutes and won’t require any specialty cleaners you don’t already own.Tools and Supplies
- Dish soap (any brand)
- Microfiber cloths (2–3)
- A butter knife or foam paintbrush
- Non-abrasive sponge
- Bar Keepers Friend (or a similar oxalic acid cleaner)
- White vinegar
- Lemon peels (optional but helpful)
- A small bowl or sink for soaking
- A soft toothbrush (for tight spots)
Time:25–35 minutesSkill level:
Beginner, no electrical disassembly needed
Step 1: Disassemble and Clean the Lid Assembly
Pop off the sealing ring, remove the anti-block shield, and scrub every part of the lid that normally hides under pressure. This step alone fixes 80% of odor and pressure problems.
After pulling those off, wash them in warm soapy water. Now, plus, don’t just rinse, use your fingers to rub every silicone groove seeing as that’s where garlic particles hide. If you’ve been cooking with cumin.
Arguably i’ve tried baking it, boiling it, and leaving it in the sun and, honestly, the freezer trick works best. Put the ring in a ziplock bag (which is a critical factor) and freeze it overnight. Makes you think, doesn’t it? The data backs it up. The cold breaks down the odor molecules.
By most accounts, alternatively, run a 5-minute steam cycle with 1 cup water, 1 cup white vinegar. A handful of lemon peels inside the pot, lid on, sealing valve set to Sealing… both methods get rid of the stubborn funk that taints your next batch of yogurt.
Why does my sealing ring still smell after washing?
It’s not your fault, silicone is naturally porous, so it absorbs pungent oils like a sponge. Soaking in a 50/50 vinegar-water solution for 20 minutes, then scrubbing with a paste of baking soda and dish soap, can help.
If the smell doesn’t budge. After two take a shot at. It’s time to replace the ring.
They cost under $10 and are widely available. Many experienced Instant Pot owners actually keep two rings. One for savory dishes (stews — curries) and one for sweet (cheesecake — oatmeal).
It’s a $7 investment that saves you — okay, more accurately, from the tragic taste of garlic-tainted rice pudding.
Step 2: Deep Clean the Inner Pot and Banish Stains
Even when the pot looks clean, a thin layer of starch or mineral scale can trigger a burn notice or cause food to stick. A quick scrub with the right cleaner restores the original 304 stainless surface.
Pivoting slightly, and yet, bar Keepers Friend contains oxalic acid, and which safely removes the oxidized layer that creates those iridescent rainbows. You don’t need bleach or anything harsh. Rinse thoroughly so no residue remains—this prevents a metallic taste.
The inner pot is food-grade 304 (18/8) stainless steel, so you can scrub without worrying about damaging a nonstick coating. If you prefer, a 30-minute soak in a 50/50 water-vinegar solution also dissolves the minerals. Though you might need a soft sponge afterward to wipe away loosened scale.
Can I put the inner pot in the dishwasher?
100%—Instant’s official care guide confirms the pot, lid. Hard to ignore those numbers. That’s a significant gap. And steam rack are all top-rack dishwasher safe.
Repeated dishwasher cycles can dull the brushed finish over time. Hand washing keeps it looking newer longer.
In real-world terms, if you do use a dishwasher, avoid cramming it next to cast iron — or aluminum pans to prevent galvanic corrosion spots.
“That crumb trench? Dirty enough to breed bacteria that’ll taint your next batch of rice.”
🐦 Click to Tweet →
Step 3: Scrub the Base, Empty the Condensation Collector, and Wipe the Heating Element
The outer housing can’t be submerged, but accumulated splatter on the heating element and a forgotten condensation cup are the top reasons Instant Pots develop a musty smell or throw error codes.
While the pot is unplugged and completely cool. Use a damp cloth (not wet) to wipe the heating element. The silver disk inside the base.
In most scenarios, never pour water directly into the housing because the (which works out well in practice) electronic motherboard sits right underneath. Funny enough, just a light wipe removes dried-on starch and splatters. Then take that foam paintbrush or a butter knife wrapped in a dry microfiber cloth. To be more precise, and run it all around the deep rim (a detail regularly overlooked) of the cooker base. This area traps dried food and dust like crazy.
And a regular sponge can’t reach it. A surprising amount of brown gunk comes out, and when I first did this after six months of use, I pulled out enough debris to fill a teaspoon.
The steam release handle feels sticky—how do I fix it?
In short, blocksep matters. Often the small plastic handle on the lid.
And the pin it covers get coated with starch. Pull the handle off by pinching the side tabs, then use a soft toothbrush…which means and warm soapy water to scrub both the handle’s inner channel and the metal pin.
Dry completely before snapping it back. If the problem persists. Soak the entire lid in warm water for 15 minutes to dissolve hidden residue.
That usually frees it right up.
Troubleshooting Common Issues, People Also Ask, and What to Do Next
Why does my Instant Pot keep showing a “Burn” message?
A Burn notice almost always means there’s a thin layer of food or starch stuck on the bottom of the inner pot that the sensor reads as overheating. Scrub the pot with Bar Keepers Friend, rinse thoroughly, and make sure you’re adding enough thin liquid before pressure cooking, no less than 1 cup.
After deep cleaning, the issue disappears in about 90% of cases. If it keeps happening, check that the float valve in the lid moves freely and the anti-block shield is clear. A clogged valve can trick the sensor into thinking it’s overheating.
The sealing ring still smells after washing. Help.
Freeze it overnight or run the vinegar/lemon steam cycle. If after two attempts it’s still smelly, replace it for under $10, the porosity eventually saturates.
Dedicate one ring to savory and one to sweet to stop flavor transfer for good. That’s the advice you’ll see echoed across Reddit and Facebook groups, and it’s the only way to reliably avoid garlic cheesecake.
Can I put the Instant Pot lid in the dishwasher?
Yes, the lid (including the sealing ring and anti-block shield) is top-rack dishwasher safe, according to Instant’s care guide. But the high heat and detergent can shorten the life of the silicone ring, so hand washing is gentler.
Remove the ring from the lid before loading to let water spray all the crevices.
How often should I clean the condensation collector?
Once a week if you use the pot multiple times a day; at minimum every 10 uses. An overflowing collector drips onto your counter and can become a mold magnet.
Emptying it takes 5 seconds and eliminates that faint musty odor around the appliance.
Is it safe to wipe the heating element with a damp cloth?
Yes, as long as the Instant Pot is unplugged and completely cool. Use only a slightly damp cloth, no dripping water, and never pour liquid directly into the base. Dry it with a soft, dry cloth right after. This prevents starch buildup that can lead to uneven heating and eventual sensor failure.
- Set a recurring calendar reminder — every 5 uses, run through the full 30-minute deep clean to avoid slow buildup.
- Buy a second sealing ring — label one “savory” and one “sweet” to prevent flavor ghosting.
- Wipe the heating element monthly — even a quick dry-wipe keeps the sensor accurate.
- Empty the condensation collector after every stew or curry — it’s easy to forget, but a weekly habit stops mold.
What to Do Next
Now, now that your Instant Pot sparkles inside and out, put it back together — run a 2-minute water test (1 cup water, seal vent; pressure cook) to confirm everything seals properly. While you’re at it.
Mostly, and if your dishwasher is leaving spots on the freshly cleaned pot. Learning how to clean a frigidaire dishwasher could work out that…which means for coffee lovers, the same careful approach works wonders when you clean your breville grinder.
Plus, with a clean cooker, you’ll notice faster pressurization, zero, hmm, let me put it differently, funky smells, and flavors that taste exactly like they should.
🔍 Research Sources
Verified high-authority references used for this article