
Your Xbox Series X is a precision gaming rig. Without a doubt. Dust is its silent enemy. Precisely. Let a fine layer of dust settle into the vertical chimney design, and within months you’ll hear the fan increase, feel the heat, and maybe see that dreaded overheating alert.
The good news is learning how to clean a Xbox Series X properly isn’t rocket science, it’s a 30-minute job that saves you from choppy frame rates and would-be power-supply failure.
TL; DR
- Wipe the exterior vents weekly with a dry microfiber cloth—the bottom intake acts like a magnet.
- Use short bursts of compressed air through the top exhaust while holding the fan still with a toothpick to prevent bearing damage.
- For a deep clean, you’ll need Torx TR8 and TR10 security screwdrivers—and a bit of patience—but it’s the only way to clear the “dust mat” that forms on the vapor chamber fins.
Key Point–Bottom vents collect the most dust, so weekly maintenance here prevents 80% of thermal issues.
- Compressed air alone won’t help past surface grime; you need to hold the 130mm fan steady to avoid sending a current spike back into the motherboard—a costly mistake.
- Disinfectant wipes containing bleach eat away the matte plastic finish over time, so stick to 70% isopropyl alcohol on a cloth.
What You’ll Need
Cleaning the Series X takes about 15 minutes for exterior care. About 45 minutes if you intend to open the case.
At a high level, skill level depends on how deep you go, so surface cleaning is beginner-friendly, while opening the console demands comfort with small electronics.
Gather these items before you start.
| Item | Why You Need It |
|---|---|
| Microfiber cloths | Lint-free, won’t scratch the matte shell |
| Compressed air canister (or electric duster) | Blasts dust out of vents without physical contact |
| Toothpick or plastic probe | Locks the fan blades to prevent over-spinning when using air |
| 70% isopropyl alcohol (or a mild, bleach-free cleaner) | Sanitizes and cuts grime on the exterior without degrading plastic |
| Soft-bristled paintbrush (clean, unused) | Loosens stubborn dust before air is used |
| TR8 and TR10 Torx security screwdrivers | Required to remove the back panel’s security screws |
| Plastic spudger or guitar pick | Helps gently separate the plastic clips without snapping them |
This is where it gets practical. Across the board, don’t use a household vacuum near the vents. The static electricity it builds up can fry sensitive logic boards, an expensive (at least based on current observations) roll of the dice.
Step 1: Power Down and Unplug Everything
You’ll notice a dead console is a safe console. Shut down the Xbox completely, unplug its power cable. In tons of cases, wait a full minute for capacitors to drain; that way you avoid any chance of a short when metal tools come near the board later. Rest the console on a clean table. Top exhaust facing up.
Pro tip: Use this wait time to gather your assets. A well-lit workspace with a towel underneath catches falling screws.
Step 2: Tackle the Exterior Shell and Vents
Circling back for a moment. About 70% of the audible fan noise improvements come from unclogging the outer grills—no disassembly needed. Make of that what you will. That’s a significant gap. Focus on the circular bottom intake, the rectangular rear intakes, and the wide top exhaust. A dry microfiber pass removes loose particles; dampen a corner with 70% isopropyl alcohol for sticky residue, but rarely ever spray liquid directly onto the console—apply it to the cloth first.
Probably and pushes heat out the top, these vents act like a chimney. Dust gets trapped in a “mat” on the heat sink fins you can’t see yet. So the next step is key even if you never open the console.
Step 3: Blow Out Internal Dust Properly (Without Opening)
You can clean the fan and top heatsink area without ever touching a screwdriver. But only if you do it right. Insert the thin straw of a compressed air canister through the top exhaust opening, which means actually, the big danger here is letting the 130mm fan spin freely; at high RPMs it behaves like a generator. IFixit’s team warns: “Always use short bursts of air. Time will tell. ” Use one hand to hold a toothpick.
Or plastic probe against a fan blade, locking it in place, while you blast the dust away with the other.
Can I use a vacuum instead of compressed air?
Don’t. A vacuum’s nozzle generates static electricity that can zap the mainboard; if you absolutely must. Use an anti-static vacuum attachment made for electronics, but compressed air is the safer, affordable choice.
After five or six short bursts through the top. Move to the rear vents and do the same.
You’ll see a cloud of dust exit—that’s the loose stuff — which is why what’s left is the caked-on mat that only a full teardown removes. Which brings us to step 4.
Step 4: Open the Console for a Deep Clean
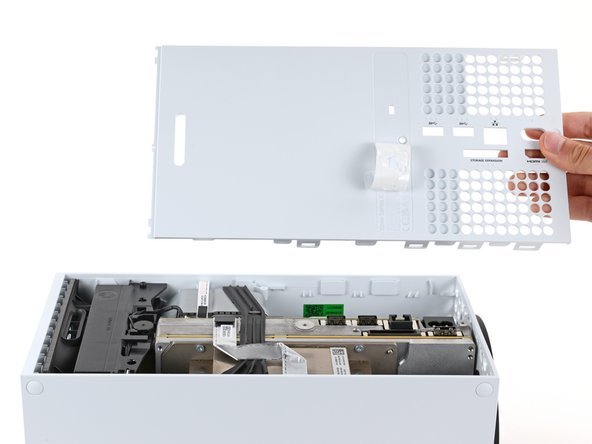
Keep in mind what we talked about earlier, this is. Where you’ll really need to know how to clean a Xbox Series X at (at least based on current observations) the component level. Take that with a grain of salt. Grab your TR8 and TR10 Torx security bits.
there’re two screws under the bottom sticker (one of those legally questionable, I mean, “warranty void” stickers, more on that later) and a few around the back plate. Here’s the other side of it.
Within this context, remove them. Then use a plastic spudger to gently separate the clips. Work slowly around the perimeter. The plastic is forgiving but can snap if you rush.
Once inside, you’ll face the thick aluminum and copper vapor chamber, and look between the fins: that fluffy gray blanket is the “dust mat” that’s been choking your console. Use the paintbrush to loosen it. Then blow it out with compressed air. Clean the 130mm axial fan blades with the brush too, don’t twist the fan, just gently sweep.
At least, that outlines the core theory.
This deep clean method also works on the Series S. In fact, the process is nearly identical. For a full walkthrough on the smaller console. Check out our specific guide for cleaning the Xbox Series S.
Looking at this from another angle, reassembly is the reverse. More data needed.
In practical terms, connect the back cover carefully. So clips snap into place without force. Then reinsert and lightly tighten the screws. Don’t overtighten, you’ll crack the plastic.
Troubleshooting Common Issues
Even careful cleaners hit snags. Here are the most common fixes.
**The console still shows an overheating warning after cleaning.**The thermal paste between the SoC and the vapor chamber may have dried out. Replacing it requires removing the internal shield and is better left to a repair shop unless you’re experienced. Alternatively, the fan might have failed, listen for unusual grinding.
The fan seems louder than before.You may have dislodged dust that’s now rattling around, or accidentally bent a fan blade. Disassemble again and inspect. Sometimes a stray screw under the fan bracket causes vibration.
The back panel won’t sit flush.One of the plastic clips hasn’t engaged. Press firmly along each edge; you’ll hear a series of clicks. If a clip snapped, a tiny dab of black silicone adhesive (non-conductive) can secure that corner without shorting components.
Static discharge fear. If you ever worry about zapping the board, use an anti-static wrist strap grounded to the PC case or any metal water pipe. Or simply touch a grounded metal object before touching internals.
What to Do Next
From what we can tell, wipe the exterior vents every Saturday morning—it takes 60 seconds. That’s a significant gap. So schedule a compressed-air blow-out every three months. Let that sink in for a second.
Double that frequency. If you game in a dusty environment or have pets.
The console’s thermal sensors will thank you with consistent silence. And frame rates that don’t dip mid-match.
- Wipe the bottom intake vents every week — Use a dry microfiber cloth to prevent dust buildup that restricts airflow.
- Apply compressed air every three months — Hold the fan still and use short bursts through top and rear vents.
- Deep clean once a year — Disassemble with TR8 and TR10 drivers to remove the dust mat from the vapor chamber fins.
- Avoid bleach-based wipes — Use only 70% isopropyl alcohol on a cloth to preserve the matte finish.
FAQs
How often should I clean my Xbox Series X?
For light use, do a weekly exterior wipe. And a quarterly compressed air blow-out.
And sure enough, in homes with pets. Or carpet, increase the air blast to monthly. Backed by research.
More importantly, the deep open-case cleaning is typically needed only once a year. Or when you notice the fan running constantly loud.
Will opening the console void my warranty?
Not necessarily. While a sticker warns against it. It stands out. Consumer protection agencies like the FTC in the US have ruled that repair restrictions can’t be enforced solely through warranty stickers. Still, any damage you cause during opening is your responsibility. (at least based on current observations) so move carefully.
Can I use a household cleaner on the shell?
No. Microsoft Actually, advises against bleached or heavy-duty wipes because they degrade the matte plastic. So stick to isopropyl alcohol (70% or lower) on a lint-free cloth, or just a slightly damp microfiber for light smudges.
What’s that “hot electronics” smell after cleaning?
If you used a liquid cleaner. And didn’t let the (a detail often overlooked) console dry completely. Moisture might be heating up on internal components. Yet — unplug immediately — let it air out for 24 hours. And rarely ever spray anything head-on onto the vents again.
Do I really need Torx screwdrivers for a deep clean?
Yes. Using security Torx screws (TR8. And TR10) with a center pin that standard bits can’t grip, the Series X. What happens when you do? Attempting to use a flathead. Or wrong bit is a ticket to a stripped screw and a much bigger headache.
Is it safe to clean the Xbox Series X while it’s lying horizontally?
Yes, but it’s less great for airflow cleaning. The vertical chimney design works with gravity. So holding the console upside down. When blowing compressed air into the bottom can help dislodge dust that would otherwise settle (and that implies quite a bit) on the heat sink. However, nuance is required here.
🔍 Research Sources
Verified high-authority references used for this article