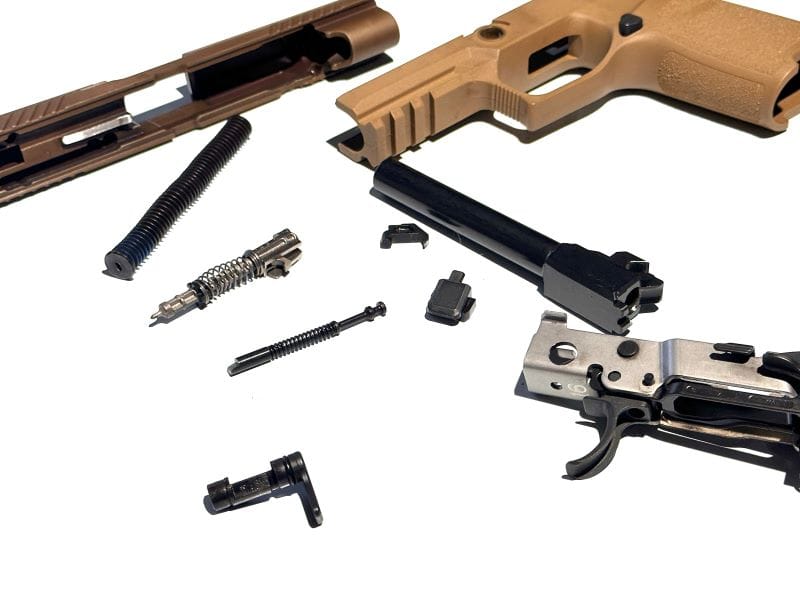
To clean a Sig P320, disassemble the gun, scrub all parts with a gun cleaning brush and solvent, oil lightly, and reassemble. The Sig Sauer P320 is a popular handgun known for its reliability and ease of use.
Regular cleaning and maintenance are essential to keep your Sig P320 functioning properly and ensure its longevity. In this guide, we will walk you through the step-by-step process of cleaning your Sig P320 effectively. By following these simple instructions, you can ensure that your firearm remains in top condition and performs flawlessly every time you use it.
Let’s dive into the details of how to clean your Sig P320 properly to maintain its peak performance and reliability.

Credit: m.youtube.com
Safety Measures
Discover the best safety measures to effectively clean your Sig P320. Follow these easy steps to ensure proper cleaning without compromising firearm performance and safety.
Unload The Firearm
Before you begin cleaning your Sig P320, it is crucial to ensure the firearm is completely unloaded. This is the first and most important safety measure to follow. Double-check the chamber, magazine, and any other areas where ammunition may be present. Always treat the firearm as if it is loaded, even if you are confident that it is not.
Ensure Safe Workspace
Creating a safe workspace is imperative when cleaning your Sig P320 to prevent any accidents or mishaps. Dedicate a specific area for cleaning that is well-ventilated and free from distractions. It is recommended to use a cleaning mat to protect your work surface and keep the firearm stable during the cleaning process. Keep all ammunition and other firearms securely stored away from the cleaning area.
Disassembly
The disassembly process of the Sig P320 is an essential part of maintaining and cleaning your firearm. Proper disassembly ensures that each component is thoroughly cleaned and inspected for wear and tear.
Field Strip The Sig P320
To begin the disassembly process, start by field stripping the Sig P320. Here’s a simple step-by-step guide:
- Ensure the firearm is unloaded and the magazine is removed.
- Move the slide to the rear position and lock it in place using the slide catch lever.
- Rotate the takedown lever clockwise 90 degrees.
- Release the slide and pull it forward off the frame.
Remove The Slide
With the slide removed, it’s time to focus on removing the internal components. Here’s how to remove the slide:
- Push the striker assembly plate down and remove it from the slide.
- Take out the striker assembly and extractor.
- Carefully remove the barrel from the slide.
Take Out The Recoil Spring Assembly
Now, it’s time to remove the recoil spring assembly. Here’s how to proceed:
- Push the recoil spring guide rod forward and lift it out of the slide.
- Remove the recoil spring from the guide rod.
- Inspect each component for any dirt, debris, or signs of wear.
Cleaning The Barrel And Slide
When cleaning your Sig P320, paying special attention to the barrel and slide is crucial for maintaining its performance. Properly cleaning these components will help ensure the longevity of your firearm.
Clean The Barrel
Start by removing the barrel from the slide. Use a cleaning rod with a patch soaked in solvent to run through the barrel. Scrub the inside of the barrel to remove any buildup or residue. Wipe the barrel with a clean, dry cloth.
Clean The Slide
Separate the slide from the frame and remove all components. Wipe down the slide with a cleaning solvent to remove any debris. Pay special attention to the rails and grooves. Inspect for any wear or damage. Ensure all parts are dry before reassembly.
Cleaning The Frame
Cleaning the Frame:
Wipe Down The Frame:
Grab a clean cloth soaked in solvent.
Gently wipe the frame surface.
Ensure all grime is removed.
Remove Dirt And Debris:
Inspect frame crevices closely.
Using a brush, dislodge any dirt.
Wipe residue with a cloth.
Reassembly
After thoroughly cleaning each component of your Sig P320, it’s time to reassemble the firearm. Proper reassembly is crucial for the gun’s optimal performance and longevity. This section will guide you through the reassembly process, ensuring that each step is performed accurately and safely.
Reinstall The Recoil Spring Assembly
1. Ensure the recoil spring assembly is clean and free from any debris or residue.
2. Insert the guide rod back into the recoil spring, making sure it is properly seated.
3. Reinstall the recoil spring assembly and guide rod back into the slide, ensuring it is aligned correctly.
Attach The Slide
- 1. Carefully place the slide onto the frame and ensure it is properly aligned.
- 2. Push the slide back until it locks into place with a distinctive click.
Check For Proper Functioning
- 1. Cycle the slide several times to ensure smooth operation and proper alignment.
- 2. Perform a function check to ensure the trigger, safety, and magazine release are working correctly.

Credit: www.reddit.com

Credit: gunmagwarehouse.com
Conclusion
Maintaining your Sig P320 is crucial for its longevity and performance. Regular cleaning and proper care are necessary for a smooth functioning firearm. By following the steps outlined in this guide, you can keep your Sig P320 in top condition.
Make sure to clean it regularly and always follow safety guidelines.
