Cleaning shower caulk is simpler than you might think. It just requires the right tools and a bit of patience.
Shower caulk can get dirty over time. It can develop mold, mildew, and stains. This not only looks bad but can also affect your health. Regular cleaning keeps your shower fresh and safe. In this guide, you’ll learn easy steps to clean your shower caulk.
You don’t need special skills or expensive products. Just follow these tips to maintain a clean, bright shower. Ready to get started? Let’s dive in.
Tools And Materials Needed
Cleaning shower caulk can seem like a daunting task. But with the right tools and materials, it becomes much more manageable. In this section, we’ll outline everything you need to get started. From essential cleaning supplies to the protective gear, we’ve got you covered.
Essential Cleaning Supplies
First, gather your essential cleaning supplies. You’ll need a good scrub brush. This helps remove mold and mildew. Choose one with stiff bristles for tough spots. A toothbrush can also be useful for hard-to-reach areas.
Next, get a cleaning solution. You can use a store-bought cleaner. Or you can make your own. Mix one part bleach with ten parts water. This works well for killing mold. Vinegar and baking soda are also effective. They are less harsh and safe for most surfaces.
Don’t forget a spray bottle. This makes it easy to apply your cleaner. Paper towels or a clean rag will help you wipe down surfaces. A plastic scraper can remove stubborn caulk bits.
Protective Gear
Safety is important while cleaning. Always wear protective gear. Start with gloves. Rubber gloves protect your hands from harsh chemicals. They also keep your skin safe from mold and mildew.
Next, use a mask. A simple face mask can prevent inhaling harmful spores. This is especially important in a small, enclosed space like a bathroom.
Lastly, consider eye protection. Goggles can shield your eyes from splashes. They also protect against any dust or debris from scrubbing.
With these tools and materials, you’re ready to clean your shower caulk. Follow safety precautions and use the right supplies for a clean and fresh shower.
Preparing The Area
Cleaning shower caulk can seem like a daunting task. But with proper preparation, it becomes manageable. This section will guide you through the steps of preparing the area before you start cleaning. Ensuring a clean and safe working space is essential for effective cleaning.
Clearing The Shower
Start by removing all items from the shower. This includes shampoo bottles, soap dishes, and razors. Ensure no loose objects are left behind. This creates a clear space to work in.
Next, wipe down the shower walls and floor. This removes any immediate grime or soap scum. Use a damp cloth for this step. Ensure the surface is dry before proceeding.
Ventilation Tips
Good ventilation is crucial during cleaning. Open a window if your bathroom has one. This helps in dispersing any fumes from cleaning products.
Turn on the bathroom fan. This improves air circulation. If you don’t have a fan, consider using a portable one. Position it to face the shower area.
Proper ventilation not only keeps the air fresh but also protects you from harmful fumes. It ensures a safer cleaning environment.
Assessing The Caulk Condition
Before starting the cleaning process, it’s important to assess the condition of your shower caulk. This step helps you understand what you’re dealing with and the best approach to take. Let’s break it down into two key areas.
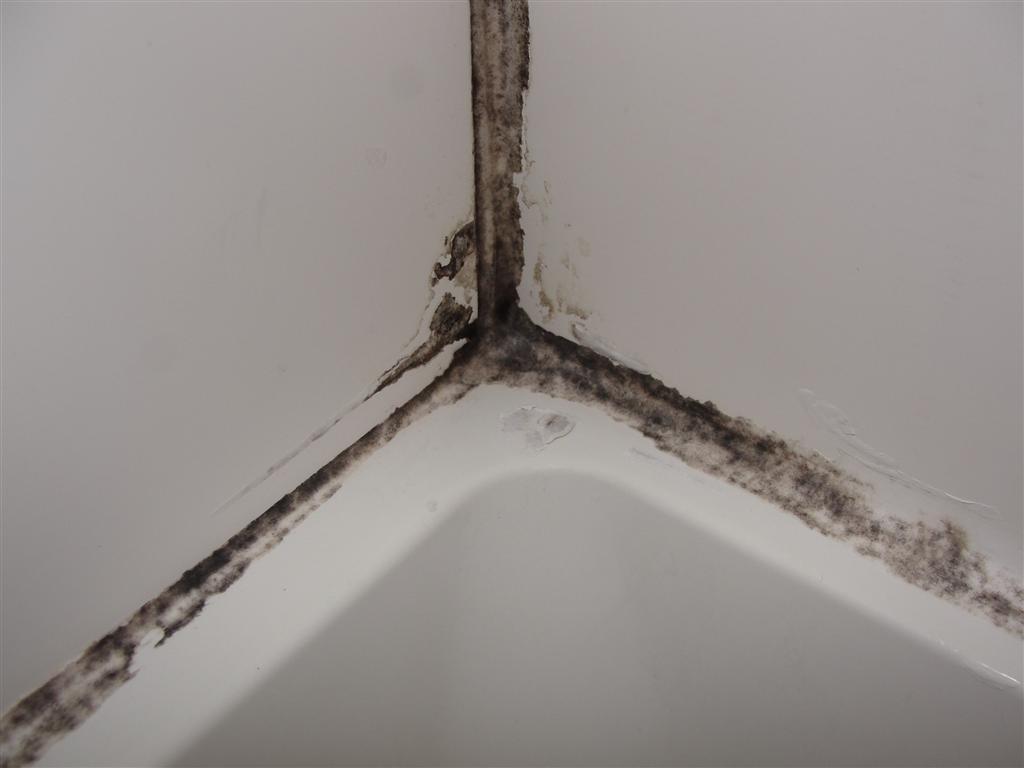
Checking For Mold And Mildew
Mold and mildew are common issues in shower caulk. They can cause health problems and make your shower look dirty. To check for mold and mildew:
- Look for black or dark spots on the caulk.
- Check for a musty smell in the shower area.
- Use a flashlight to inspect hard-to-see areas.
If you find mold or mildew, you’ll need to use a cleaner that can kill these fungi. This step is crucial for a safe and clean shower.
Identifying Damaged Caulk
Next, check if the caulk is damaged. Damaged caulk can lead to water leaks and more serious problems. Here’s how to identify damaged caulk:
- Check for cracks or gaps in the caulk line.
- Press on the caulk to see if it feels loose or spongy.
- Look for areas where the caulk is peeling away from the surface.
If you find any damage, you might need to remove and replace the caulk. This ensures a watertight seal in your shower.
| Issue | Signs |
|---|---|
| Mold and Mildew | Black spots, musty smell, visible fungi |
| Damaged Caulk | Cracks, gaps, loose or peeling caulk |
Removing Old Caulk
Removing old caulk from your shower is an important step. It ensures a clean and fresh base for new caulk. Old caulk can look dirty and hold mold. Here’s how you can remove it efficiently.
Tools For Removal
Before starting, gather the right tools. The right tools make the job easier and faster.
- Utility knife
- Caulk remover tool
- Needle-nose pliers
- Rubbing alcohol
- Clean rags
- Bucket of warm water
- Scrub brush
Step-by-step Removal Process
Start by cutting along the edges of the old caulk. Use the utility knife carefully to avoid scratching tiles. Next, use the caulk remover tool to loosen the caulk. Pull away the loosened caulk with needle-nose pliers.
After removing the bulk of the caulk, clean the area. Dip a clean rag in rubbing alcohol. Wipe the surface to remove any residue. Use a scrub brush if needed to get a clean finish.
Rinse the area with warm water. Dry it with another clean rag. This ensures no moisture remains before applying new caulk. Following these steps will help you remove old caulk effectively.
Cleaning The Surface
Shower caulk can collect mold, mildew, and soap scum over time. Regular cleaning helps keep it looking fresh and extends its life. Follow these steps to clean the surface effectively.
Effective Cleaning Solutions
Choose the right cleaning solution for your shower caulk. Here are some effective options:
- White Vinegar: A natural cleaner that kills mold and mildew.
- Bleach: Powerful for tough stains but should be used with care.
- Baking Soda Paste: Mix baking soda with water to create a paste.
- Hydrogen Peroxide: Good for disinfecting and whitening caulk.
Scrubbing Techniques
Proper scrubbing ensures thorough cleaning. Use these techniques:
- Apply the Cleaner: Apply your chosen cleaner to the caulk.
- Let it Sit: Allow the solution to sit for 10-15 minutes.
- Scrub Gently: Use a soft brush or old toothbrush to scrub the caulk.
- Rinse and Dry: Rinse with water and dry with a clean cloth.
| Cleaning Solution | Pros | Cons |
|---|---|---|
| White Vinegar | Natural, effective against mold | Strong smell |
| Bleach | Strong cleaner, removes tough stains | Harsh, can discolor caulk |
| Baking Soda Paste | Gentle, natural | Less effective on tough stains |
| Hydrogen Peroxide | Disinfects, whitens | Less effective on heavy mold |
Applying New Caulk
Cleaning shower caulk can be a daunting task, but applying new caulk is the final step to achieving a fresh, clean look. Proper application ensures a watertight seal and prevents mold and mildew growth.
This guide will help you choose the right caulk and provide essential application tips.
Choosing The Right Caulk
Selecting the right caulk is crucial. Silicone caulk is water-resistant and flexible, making it ideal for showers. Acrylic caulk is easier to apply and clean up, but it may not last as long in wet conditions.
Look for caulk labeled as “mold-resistant” or “bathroom caulk” to ensure durability. White caulk is standard, but clear caulk is available if you prefer a less visible seal.
Application Tips
First, ensure the area is completely dry. Remove old caulk with a caulk remover tool. Clean the surface with rubbing alcohol to eliminate any residue.
Cut the tip of the caulk tube at a 45-degree angle. This helps control the flow. Apply the caulk in a steady, continuous line. Use even pressure to avoid gaps.
Smooth the caulk with a caulk smoothing tool or your finger. Wet your finger with water to prevent sticking. Allow the caulk to cure for at least 24 hours before using the shower.
Proper application will keep your shower looking clean and new for a long time.
Finishing Touches
After cleaning shower caulk, the finishing touches ensure a smooth, professional look. These steps are crucial for a durable, clean finish. Follow the guidelines below to achieve a pristine result.
Smoothing The Caulk
Once you apply the caulk, smoothing it out is essential. This step helps to seal gaps and avoid water damage. Follow these steps:
- Wet your finger or a caulk smoothing tool.
- Gently run it along the caulk line.
- Ensure even pressure for a consistent finish.
Always keep a damp cloth nearby. Use it to wipe off excess caulk. This prevents mess and ensures a neat line.
Allowing Proper Drying Time
Proper drying time is crucial for the caulk to set correctly. Follow the manufacturer’s instructions. Typically, allow at least 24 hours for drying.
Ensure the bathroom remains dry during this period. Avoid using the shower to prevent moisture from interfering with the caulk.
Good ventilation speeds up the drying process. Keep windows open or use a fan if possible.
Maintenance Tips
Maintaining clean shower caulk not only enhances the look of your bathroom but also ensures a hygienic environment. Regular care can prevent mold and mildew buildup, extending the life of your caulk. Follow these maintenance tips to keep your shower caulk in top shape.
Regular Cleaning Routine
Establishing a regular cleaning routine is essential. Here’s a simple plan:
- Weekly Cleaning: Mix warm water with mild detergent.
- Scrub Gently: Use a soft brush or sponge.
- Rinse Thoroughly: Remove all soap residue.
- Dry Completely: Use a clean towel to dry the area.
This routine prevents soap scum and dirt from accumulating on the caulk.
Preventing Future Issues
Preventing future issues with shower caulk involves a few proactive steps.
- Ensure Proper Ventilation: Use an exhaust fan or open windows during and after showers.
- Fix Leaks Promptly: Address any leaks around the shower area immediately.
- Use a Squeegee: Remove excess water from the walls and caulk after each shower.
- Apply a Mold-Resistant Sealant: Consider using a sealant that is resistant to mold and mildew.
These steps can minimize the risk of mold growth and caulk damage.
| Task | Frequency |
|---|---|
| Clean with mild detergent | Weekly |
| Dry the area | After each use |
| Check for leaks | Monthly |
| Ventilate the bathroom | Daily |
Implementing these maintenance tips ensures your shower caulk stays clean and mold-free.
Frequently Asked Questions
How Often Should You Clean Shower Caulk?
Clean shower caulk every month. This prevents mold and mildew buildup.
What Tools Do You Need To Clean Shower Caulk?
Use a scrub brush, vinegar, baking soda, and a cloth. Simple tools work best.
How Do You Remove Mold From Shower Caulk?
Mix vinegar and baking soda. Scrub the caulk gently. Rinse with water.
Can You Use Bleach On Shower Caulk?
Yes, but use it sparingly. Bleach can weaken caulk over time.
How To Prevent Mold On Shower Caulk?
Keep the shower dry. Use a fan. Clean regularly. This helps prevent mold growth.
Conclusion
Cleaning shower caulk doesn’t have to be difficult. Follow the steps regularly. This helps keep your bathroom fresh and clean. Make sure to gather all necessary tools beforehand. Remember to use safe cleaning products. This protects your health and the environment.
Regular maintenance prevents mold and mildew buildup. A clean shower adds comfort to your daily routine. Happy cleaning!