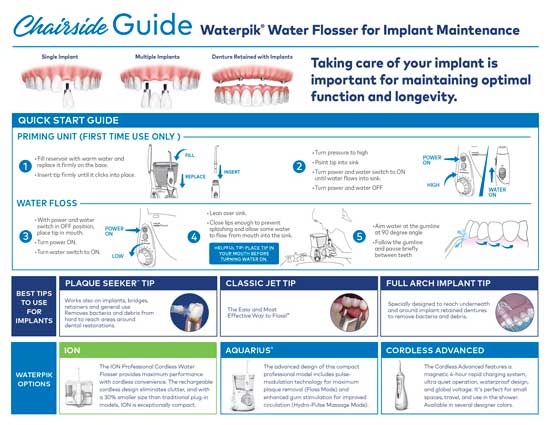
To clean implants with Waterpik, use a low-pressure setting and aim the flosser at a 90-degree angle. This helps remove plaque effectively.
Maintaining good oral hygiene is crucial for the longevity of dental implants. Proper cleaning with Waterpik can prevent complications such as gum disease and implant failure. By incorporating Waterpik into your daily dental routine, you can ensure your implants stay clean and healthy.
Let’s delve deeper into the benefits and techniques of using Waterpik for implant cleaning.

Credit: www.waterpik.com
Step-by-step Guide To Cleaning Implants With Waterpik
Discover the efficient way to maintain oral implants with a Waterpik. This step-by-step guide outlines the process for effective implant cleaning at home. Improve your oral health by incorporating this simple method into your daily routine.
Step-by-Step Guide to Cleaning Implants with WaterpikMaintaining proper dental hygiene is essential for the longevity and health of dental implants. One effective method for cleaning implants is by using a Waterpik. In this step-by-step guide, we will walk you through the process of cleaning implants with a Waterpik, ensuring that your oral health remains in optimal condition.Preparing The Waterpik
Start by ensuring that your Waterpik is ready for use. Follow these steps to prepare your Waterpik before cleaning your implants:- Fill the Waterpik reservoir with warm water. Aim for a temperature that is comfortable for your mouth.
- If desired, add a mouthwash to the water. This can provide an extra level of freshness and help kill bacteria.
- Attach the appropriate tip to the Waterpik. For cleaning implants, a standard jet tip or a specialized orthodontic tip can be used.
- Adjust the pressure setting on the Waterpik to a level that is comfortable for you. Start with a lower setting and gradually increase it if needed.
Using The Waterpik On Implants
Now that your Waterpik is prepared, you can begin cleaning your implants using the following steps:- Position the tip of the Waterpik close to your implants, ensuring proper contact.
- Turn on the Waterpik and allow the water to flow into your mouth. Start with the lowest pressure setting and increase it gradually if necessary.
- Aim the water stream directly at the implants and move the tip around each implant, paying special attention to the gum line and hard-to-reach areas.
- If you have multiple implants, make sure to clean around each one individually.
- Continue this process for about one minute, ensuring thorough cleaning of all the implant surfaces and the gum line.
Cleaning The Waterpik After Use
After using the Waterpik on your implants, it’s important to clean the device to maintain its effectiveness and prevent bacteria buildup. Follow these steps for cleaning your Waterpik:- Turn off the Waterpik and unplug it from the power source.
- Remove the tip from the device.
- Empty any remaining water from the reservoir.
- Rinse the reservoir and tip with clean water.
- If desired, use a mild soap or dish detergent to clean the tip and reservoir.
- Rinse thoroughly to remove any soap residue.
- Allow the Waterpik and its components to air dry completely before storing them.

Credit: www.waterpik.com
Tips And Precautions
Tips and Precautions for Cleaning Implants With Waterpik
When it comes to maintaining oral hygiene, using a Waterpik to clean implants can be effective. However, it’s essential to follow some tips and precautions to ensure safety and effectiveness.
Choosing The Right Waterpik
First and foremost, select the appropriate Waterpik model suitable for cleaning implants. Look for a unit that features specialized tips specifically designed for dental implants. Models with adjustable pressure settings can also be beneficial for personalized usage.
Using The Correct Waterpik Settings
Ensure that the Waterpik’s pressure setting is appropriate for cleaning implants. Start with a lower pressure and gradually increase it if required. Additionally, make sure to use the correct tip designed for implants to avoid causing damage.
Consulting Your Dentist
Prior to using a Waterpik for implant cleaning, consult your dentist for personalized guidance. Your dentist can provide valuable advice on the most suitable Waterpik model, pressure settings, and usage frequency based on your specific implant type and oral health condition.

Credit: www.dentalimplantsonmiller.com.au
Conclusion
Using a Waterpik for cleaning implants is a valuable tool in maintaining oral health. With its gentle yet effective cleaning action, the Waterpik provides a thorough clean, reaching areas that traditional brushing and flossing may miss. By incorporating this method into your oral care routine, you can ensure the longevity and health of your implants.
