Cleaning a turkey is crucial before cooking. It ensures safety and enhances flavor.
Preparing to clean a turkey might seem daunting, but it’s a straightforward process. Whether you’re planning a festive meal or a casual dinner, knowing how to clean a turkey properly is essential. This guide will walk you through each step, making it easy and stress-free.
You’ll learn how to remove the giblets, rinse the bird, and ensure it’s ready for roasting. Let’s dive into the details and make your turkey preparation seamless. Proper cleaning sets the stage for a delicious meal, so let’s get started!
Gather Necessary Supplies
Before you clean a turkey, gather all the necessary supplies. This will make the process easier and faster. Having the right tools and safety gear ensures you handle the turkey safely.
Cleaning Tools
To clean a turkey, you will need specific tools. Here is a list:
- Sharp Knife: A sharp knife helps cut through the turkey skin and flesh easily.
- Cutting Board: Use a sturdy cutting board to keep the turkey steady.
- Kitchen Shears: Shears are useful for cutting through bones.
- Tongs: Tongs help handle the turkey without touching it directly.
- Large Bowl: A large bowl is needed to hold the parts of the turkey.
Safety Gear
Safety is important when handling raw poultry. Here are some items you should have:
- Disposable Gloves: Wear gloves to avoid direct contact with the turkey. This reduces the risk of contamination.
- Apron: An apron protects your clothes from any spills or splashes.
- Goggles: Goggles protect your eyes from any splashes.
- Disinfectant Spray: Use a disinfectant spray to clean surfaces after handling the turkey.
Prepare Your Workspace
Cleaning a turkey can be a messy task. Preparing your workspace is crucial. This step ensures safety and cleanliness. Follow these guidelines to get started.
Sanitize Surfaces
Start by sanitizing all surfaces. Use a disinfectant spray or wipes. Clean countertops, cutting boards, and any other surfaces you will use. This helps prevent contamination.
Make sure to wash your hands thoroughly. Use soap and warm water. Dry your hands with a clean towel. Repeat this process as needed.
Set Up Equipment
Gather all necessary equipment. You will need a sharp knife, kitchen shears, and a large cutting board. Have a trash can nearby for easy disposal of waste.
Place a bowl or container to catch any drippings. This keeps your workspace tidy. Also, have paper towels or a clean cloth ready. They help in cleaning spills quickly.
Finally, ensure good lighting in your workspace. It helps you see clearly and work safely. Now, you are ready to clean your turkey.
Thaw The Turkey
Before you start cleaning your turkey, you need to thaw it properly. Thawing ensures even cooking and prevents harmful bacteria growth. There are two main methods to thaw a turkey: the Refrigerator Method and the Cold Water Method. Each method has its own benefits and steps to follow.
Refrigerator Method
Thawing your turkey in the refrigerator is the safest and easiest method. It requires planning ahead, as it takes time. Follow these steps:
- Keep the turkey in its original packaging.
- Place it in a large dish or tray to catch any juices.
- Set your refrigerator to 40°F (4°C) or lower.
- Allow 24 hours of thawing time for every 4-5 pounds of turkey.
| Turkey Weight | Thawing Time |
|---|---|
| 4-12 pounds | 1-3 days |
| 12-16 pounds | 3-4 days |
| 16-20 pounds | 4-5 days |
| 20-24 pounds | 5-6 days |
Cold Water Method
If you need to thaw your turkey quickly, the cold water method is effective. Follow these steps:
- Keep the turkey in its original packaging.
- Place it in a large, leak-proof plastic bag.
- Submerge the turkey in cold water.
- Change the water every 30 minutes to keep it cold.
- Allow 30 minutes of thawing time per pound of turkey.
| Turkey Weight | Thawing Time |
|---|---|
| 4-12 pounds | 2-6 hours |
| 12-16 pounds | 6-8 hours |
| 16-20 pounds | 8-10 hours |
| 20-24 pounds | 10-12 hours |
After thawing, cook the turkey immediately. Do not refreeze it. Thawing is a crucial step to ensure a delicious, safe meal.
Remove Packaging
Removing the packaging is the first step in cleaning your turkey. This step ensures that your turkey is free from any external contaminants. It also helps you inspect the bird for any issues. Follow these simple steps to remove the packaging properly.
Unwrap Turkey
Place the turkey on a clean surface. Carefully cut open the plastic packaging with scissors. Avoid using a knife to prevent damaging the turkey. Pull the plastic wrap away from the turkey. Discard the packaging immediately to keep your workspace clean.
Inspect For Ice
Check the turkey for any ice inside the cavity. Ice can form during storage and transportation. Remove any ice you find to ensure even cooking. If the turkey is partially frozen, allow it to thaw completely before proceeding. This will make the cleaning process easier and safer.
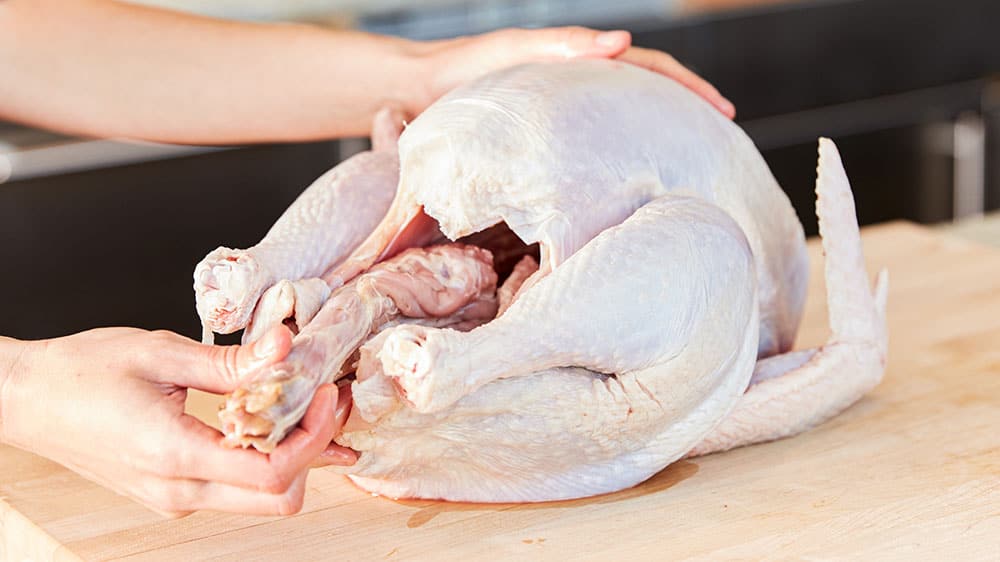
Remove Giblets
Cleaning a turkey involves several steps, but one of the most crucial is to remove the giblets. Giblets are the heart, liver, gizzard, and neck of the bird. These parts are often included in a small bag inside the turkey. Removing them is essential for food safety and preparing the turkey for cooking. Let’s break down the process into easy-to-follow steps.
Locate Cavity
First, locate the cavity of the turkey. Turkeys have two cavities: one at the neck and one at the rear. Usually, the giblets are placed inside the rear cavity. Ensure the turkey is completely thawed before you begin. This makes it easier to reach inside.
Extract Giblet Bag
Once you have located the cavity, the next step is to extract the giblet bag. Follow these steps:
- Reach inside the cavity carefully.
- Feel around for a bag or loose parts.
- Gently pull out the bag containing the giblets.
- Check both cavities to ensure all parts are removed.
Sometimes, the bag might be hidden under the neck flap. Make sure to check thoroughly. Remove any remaining parts like the neck. Place the giblets in a bowl to use later or discard them.
Removing giblets is a simple task, but it is crucial. Follow these steps to ensure your turkey is ready for the next stage of preparation.
Rinse The Turkey
Rinsing the turkey is an important step. It helps remove any leftover feathers, blood, or brine. A clean turkey ensures a better taste and texture. Follow these easy steps to rinse your turkey correctly.
Use Cold Water
Place the turkey in a clean sink. Use cold water to rinse the turkey. Cold water helps to wash away any bacteria. Make sure to rinse the inside and outside. This ensures the turkey is clean and ready for cooking.
Pat Dry
After rinsing, it’s time to dry the turkey. Use paper towels to pat the turkey dry. Drying helps the skin become crispy when cooked. Make sure to pat dry both the inside and outside. A dry turkey will cook more evenly.
Trim Excess Fat
Cleaning a turkey is an important step in preparing it for cooking. One key task is to trim the excess fat. This helps improve the taste and healthiness of your meal. Removing unnecessary fat ensures your turkey cooks evenly and looks appetizing.
Identify Fatty Areas
First, you need to identify the fatty areas on your turkey. These are typically located around the neck and cavity. Look for thick, white patches of fat. These areas can make your turkey greasy if not removed.
Using your fingers, feel around the skin to find hidden fat. The most common places are the tail end and the wing joints. Make sure to check thoroughly. Leaving even a small amount can affect the taste.
Use Sharp Knife
Next, you’ll need a sharp knife to trim the fat. A sharp blade makes the job easier and safer. Dull knives can slip and cause accidents. Always cut away from your body for safety.
Start by holding the skin taut with one hand. Use the knife to gently slice away the fat. Be careful not to remove too much skin. You want to keep the turkey intact. If you notice any remaining fat, repeat the process.
Dispose of the fat properly. Do not wash it down the sink as it can cause clogs. Instead, place it in a trash bag for easy disposal.
| Step | Description |
|---|---|
| 1 | Identify fatty areas. |
| 2 | Use sharp knife to trim fat. |
| 3 | Dispose of fat properly. |
Following these steps ensures your turkey is clean and ready for seasoning and cooking. A well-prepared turkey leads to a delicious meal.
Final Inspection
After cleaning the turkey, it is essential to do a final inspection. This step ensures the bird is ready for cooking. A thorough check guarantees a delicious meal and safe consumption. Below are the critical areas to focus on during the final inspection.
Check Cleanliness
First, look at the turkey’s skin. It should be free of feathers. Ensure there are no traces of soap or cleaning agents. Examine the cavity, making sure there are no leftover giblets. Rinse it again if you spot any debris.
Prepare For Cooking
Pat the turkey dry with paper towels. This helps achieve a crispy skin during cooking. Check the cavity for excess moisture. Remove any remaining fat or pin feathers. Your turkey is now ready for seasoning and cooking.
Frequently Asked Questions
How Do You Clean A Turkey Before Cooking?
Rinse the turkey under cold water. Remove giblets and neck. Pat dry with paper towels.
Should You Wash A Turkey Before Cooking?
Yes, rinse under cold water. This helps remove any unwanted residue and bacteria.
How Do You Remove The Giblets From A Turkey?
Check the body cavity. Pull out the giblets and neck. Dispose or save for gravy.
Do You Need To Pat Dry A Turkey?
Yes, pat the turkey dry with paper towels. This helps the skin become crispy when cooked.
What Tools Do You Need To Clean A Turkey?
Use a clean sink, cold water, and paper towels. Have a bowl for giblets and neck.
Conclusion
Cleaning a turkey is simple with these steps. First, gather your tools. Then, follow each step carefully. Remember to wash your hands often. Clean the turkey inside and out. Remove any leftover feathers. Pat the turkey dry with paper towels.
Now, your turkey is ready for cooking. Enjoy your delicious meal with loved ones. Happy cooking!