
You dip it into foundation every morning, blend. Toss it in a drawer, so that damp. Sponge-like material sits there for hours, quietly growing things you can’t see. Performance speaks. According to an Aston University study.
Coli and staph. That statistic alone explains why dermatologists see a link between dirty sponges and stubborn cystic acne; the fix isn’t complicated but it’s non-negotiable: a consistent cleaning rhythm that matches the sponge’s actual usage pattern.
TL; DR
- Clean your Beautyblender after every single use with a quick daily rinse and mild soap to stop overnight bacteria colonies from forming deep inside the foam.
- Deep clean it once a week with a solid cleanser or gentle liquid soap, squeezing repeatedly until water runs clear, then let it air dry for 6–12 hours in an open area.
- Replace the sponge every three months because even a perfectly sanitized sponge breaks down internally, trapping moisture where mold then thrives unseen.
Key Point
- A 15-second daily rinse with mild soap prevents the overnight multiplication of bacteria that triggers acne—do it right after blending. No drying rack required.
- A weekly deep cleanse removes the internal residue that daily rinses can’t reach; you’ll actually see foundation bleeding out of the sponge even after it “looks clean.”
- The microwave “sterilization” hack often melts the sponge and generates burnt plastic fumes—skip it.
- If you’ve ever cut open a 4-month-old sponge and found black speckled dots, that’s mold, and it means your drying routine failed.
What You’ll Need
Before you build the routine, gather the right solutions. The cleaning steps don’t stall halfway. The goal is to have everything at arm’s reach. Which makes consistency far easier.
You’ll want a gentle liquid soap or a dedicated solid sponge cleanser—the Beautyblender brand solid cleanser works, but Dr — bronner’s castile soap also cuts through foundation without breaking down the foam. A small textured cleaning mat or silicone brush pad helps scrub the surface. Though your fingers work fine if you apply enough friction.
Now, you’ll also need a clean. Dry towel for blotting excess moisture after rinsing. Finally, find an open, ventilated spot where the sponge can sit undisturbed for 6 to 12 hours—a wire dish rack. Or a mesh pouch hung over a hook works, but never a sealed makeup bag or (which is a critical factor) a dark drawer.
Step 1: Rinse and Clean After Every Single Use
A daily post-makeup rinse stops bacteria from feeding on the oils, and dead skin cells trapped in the foam, so it takes under 60 seconds and yields the biggest payoff for preventing breakouts. According to the American Academy of Dermatology’s advice on makeup tool hygiene.
In many cases, the thing is, as the foam expands. Add a pea-sized drop of liquid soap directly onto the stained areas. Massage the soap through the sponge for 20–30 seconds.
Paying attention to the pointed tip and the flat bottom. Where (as one might expect) product accumulates most. Rinse until no soap bubbles remain, and the squeezed water runs clear.
Squeeze excess water firmly, don’t wring or twist. Which tears the foam—then blot with a towel to speed drying.
How long does a daily rinse actually take?
Less than a minute. Once you’ve done it a few times. From what we can tell, if you’re rushed in the morning. You can do the rinse right after applying makeup at your bathroom sink.
that’s the point. Then leave the sponge on a towel to dry while you head out.
Step 2: Deep Clean the Sponge Once a Week
Daily surface rinses don’t lift the deeply lodged oils that harden the foam over time, so a weekly deep clean using a solid cleanser. Or a dedicated sponge shampoo reaches the center of the material and prevents internal staining that compromises blendability.
On closer inspection, wet the sponge completely. Then rub it over a solid cleanser bar. Or pump a quarter-sized amount of gentle, well, actually, liquid soap straight up onto the surface.
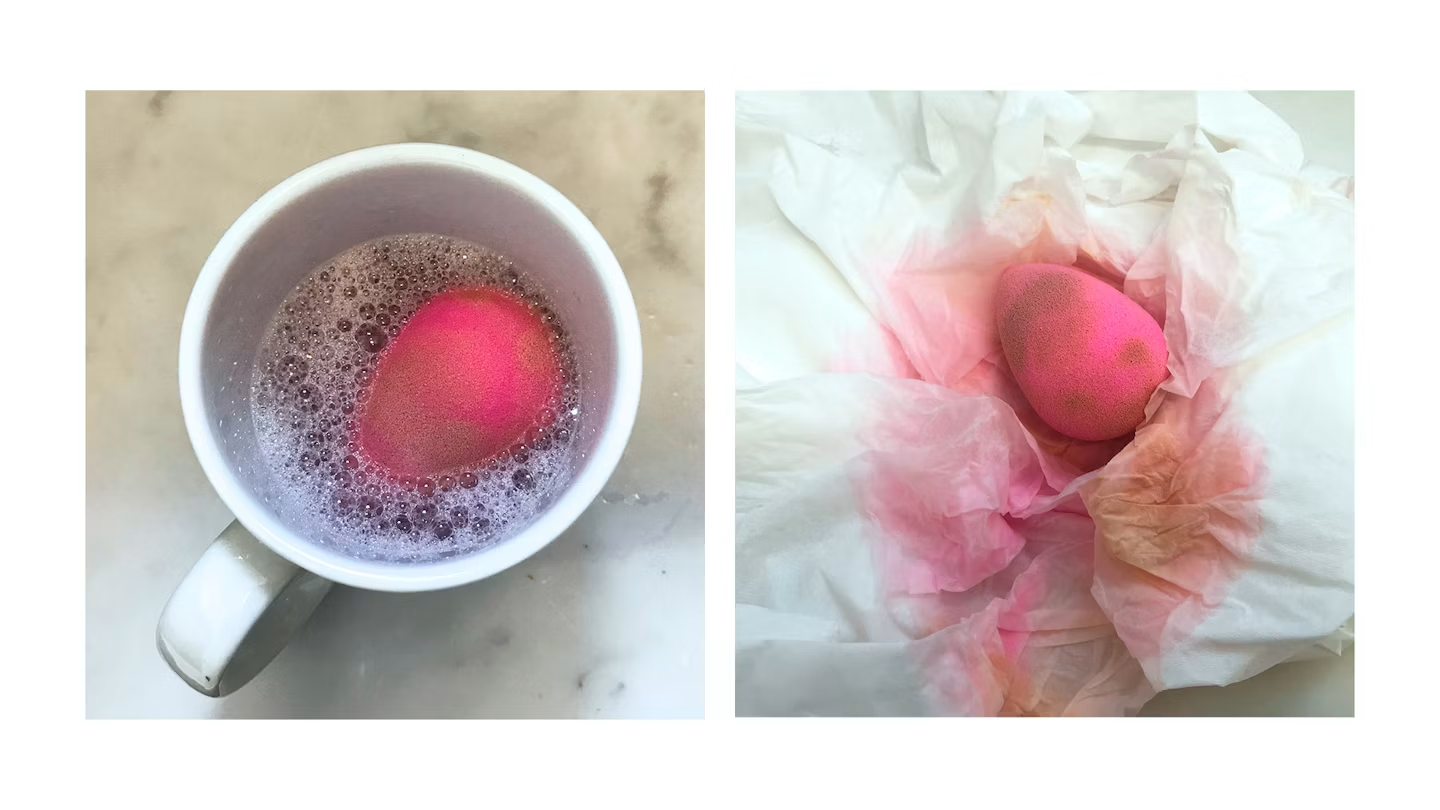
Massage and squeeze for a full minute; you’ll see brownish. Foundation-tinted suds ooze out even if the sponge appeared white before; this is years of residue slowly breaking loose.
Rinse, repeat the lather step, and check the rinse water. If it’s still cloudy, repeat the cycle, three. Or four lathers aren’t unusual for well-used sponges. When the water finally runs clear, squeeze gently and set the sponge to dry.
the same technique covers the full motion sequence.
Does the type of cleanser really matter?
Yes, and it matters more than most everyone realize. Harsh bar soaps or alcohol-based cleansers break down the sponge’s delicate polyurethane, causing tiny tears where bacteria then get trapped. Stick with pH-balanced, fragrance-free liquid soaps or the Beautyblender-brand solid.
The key here is that a $10 cleanser that extends its life by months is worth it. If you’re spending $20 on a sponge.
Step 3: Dry Your Sponge Completely Before Storing
Moisture trapped inside the sponge’s center; well, actually. Put together the dark, anaerobic conditions mold loves. A sponge that feels dry on the outside can still hold water deep inside — and that’s where hidden mold develops—the kind most of us discover when they cut open an old sponge.
After cleaning, squeeze the sponge firmly inside a clean towel to pull out as much water as possible. It might sound familiar. Then place it in an open, well-ventilated spot, a wire rack, a mesh pouch. Or even standing upright on its base with plenty of air gaps. Avoid humid bathrooms with no airflow. Plan for at least 6 hours, though overnight is safer.
Never put the sponge back into a sealed makeup bag until it’s bone dry to the touch, including the center. If your schedule forces a quicker turnaround, rotate between two sponges so one always finishes drying while the (at least in quite a few practical scenarios) other is in use.
How can you tell if the sponge is completely dry?
Squeeze it gently with your fingers. If any moisture beads appear, or if the sponge feels cool, and denser than usual, it’s not dry.
The center is the last part to lose moisture, so trust the texture and coolness more than a visual check.
Step 4: Replace the Sponge Every Three Months
Naturally, even a rigorously cleaned Beautyblender loses its structural integrity over 90 days; that’s a significant gap, yet the open-cell foam breaks down, put together micro-tears that hold onto bacteria.
Product, and the bouncy texture that blends foundation smoothly depletes. You’ll notice more streaking or uneven application when this happens.
When you look closely. Mark your calendar for 90 days from the date you opened the new sponge. Some people set a phone reminder.
Plus, when you replace it, you’ll immediately feel the difference in blendability and bounce. A fresh sponge picks up and deposits product with far less waste, and your daily cleaning routine becomes slightly faster seeing as there’s less embedded buildup to scrub out. 20 per day for a $20 sponge, the replacement cost is minimal compared to dermatologist visits for adult acne. That changes the picture quite a bit. If you use the sponge less often, say, only two.
Or three times a week, you might stretch it to 4 months, but never beyond 6. The internal degradation still occurs regardless of usage frequency.
What signs indicate it’s time to toss it sooner?
Look for small tears around the edges, a loss of the sponge’s squishy rebound — which is why or a texture that feels gummy rather than soft.
So naturally, if foundation sits on top of the sponge instead of soaking in slightly. That matters. The material has hardened beyond rescue.
Common Mistakes When Cleaning Your Beauty Blender
Most most of us who end up with breakouts. Or spoiled sponges aren’t skipping cleaning entirely, they’re making one of a handful of easily fixable errors. Recognizing these pitfalls saves time, money, and skin.
Mistake: Using hot water instead of lukewarm
Hot water can loosen adhesives inside some sponge brands and cause warping… lukewarm water effectively breaks down oils without damaging the foam’s cellular structure.
Mistake: Wringing and twisting the sponge dry
Setting that to the side, from a broader view, twisting craft internal tears that you can’t see from the outside; press and squeeze flat like a pancake, then release, repeating until most water is gone.
Mistake: Cleaning only the visible surface
In most scenarios, because the sponge is porous. Product seeps all the way to the center. Without squeezing repeatedly while soapy. You’re just cleaning the outer layer. That’s why many sponges look clean but harbor bacteria inside.
Mistake: Storing the sponge in a sealed container while damp
Sealed environments block airflow and trap humidity. Accelerating mold growth within hours. Always air dry 100% before closing any lid or bag.
People Also Ask
Can I clean my Beautyblender with just water?
Generally speaking, water alone won’t dissolve the oils. Silicones, and waxes in foundation and concealer. You’ll leave behind a biofilm that nourishes bacteria. Soap is non-negotiable to break that film.
How do I sanitize a Beautyblender without ruining it?
A weekly deep clean with gentle soap is your best bet. So avoid boiling, microwaving, or alcohol soaks, which degrade the foam. Proper drying is half the sanitization process.
Why does my Beautyblender smell bad even after cleaning?
Still, that sour odor signals mold. For instance, or bacterial colonization inside the sponge, usually from incomplete drying — which is why the sponge must be replaced; cleaning won’t eliminate the internal contamination.
100% not. Sharing a sponge transfers bacteria and skin flora directly between people. Raising the risk of staph infections — acne. And fungal conditions like ringworm.
How many times can I reuse a Beautyblender after deep cleaning?
You can reuse it safely for up to three months with proper daily rinsing. And weekly deep cleans. After that, the material degradation makes thorough sanitation impossible.
What to Do Next
If you think about it. Pull out your Beautyblender right now and give it a quick sniff. If there’s even a hint of mustiness. It’s time to follow the deep clean protocol or schedule a replacement.
For all intents and purposes, building the clean-dry-replace rhythm into your routine takes maybe two minutes over the course of a day. it’s up to you. Prevents months of skin frustration. Grab a gentle liquid soap, set a weekly phone alarm for deep cleanse day.
Pick up a spare sponge so you never have to rush the drying step. Your skin will reward the consistency with fewer unexpected breakouts.
- Rinse your sponge immediately after today’s makeup — use lukewarm water and a drop of mild cleanser, squeeze, and blot dry.
- Schedule a weekly deep clean — set a recurring alarm for a time when you can let the sponge dry for 6+ hours afterward.
- Audit your drying setup — move your sponge from a bag to an open wire rack or mesh pouch where air can circulate on all sides.
- Check your sponge’s age — if you can’t remember when you bought it, replace it now and set a 90-day phone reminder for the next swap.
🔍 Research Sources
Verified high-authority references used for this article