Table of Contents
To get lint out of a hairbrush, use a comb to remove the lint, then rinse with warm soapy water. Dry thoroughly before use.
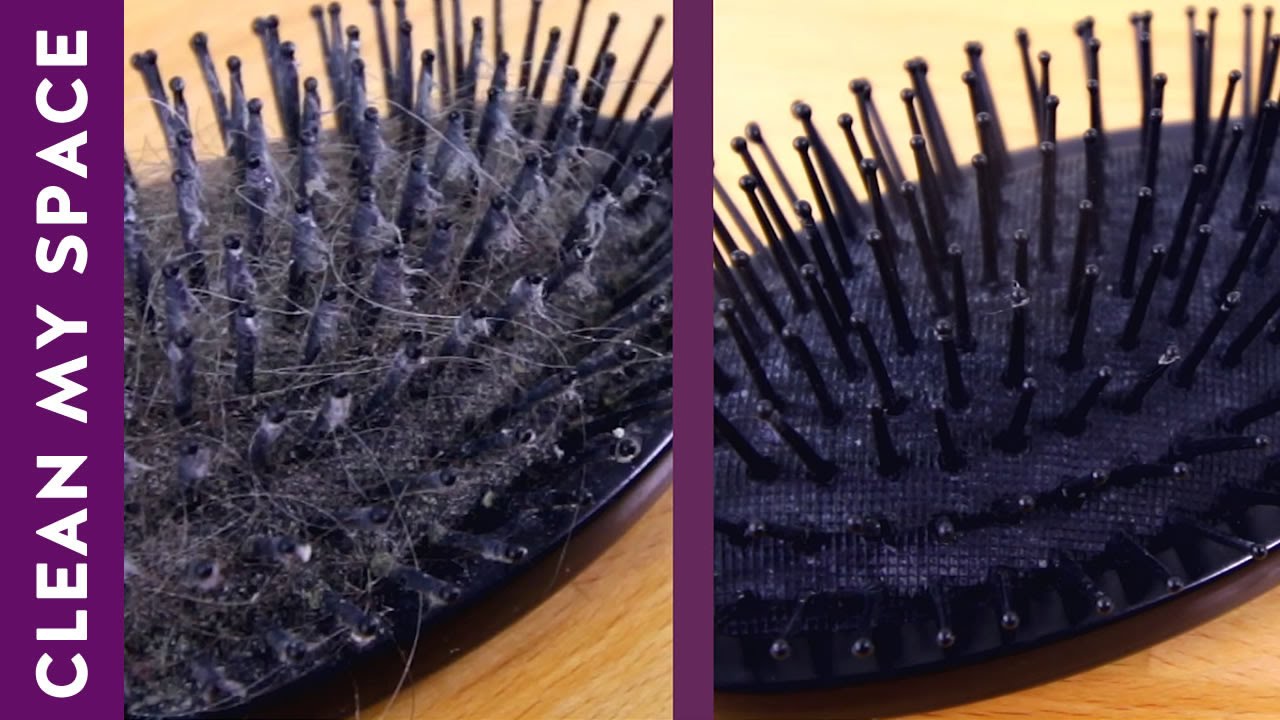
Hairbrushes collect lint, hair, and product residue over time. This buildup can affect hair health and brush performance. Regular cleaning helps maintain hygiene and extends the life of your brush. Start by using a comb or a brush cleaner to remove visible lint and hair.
Then, soak the brush in warm soapy water for a few minutes. Gently scrub with an old toothbrush to remove any stubborn debris. Rinse thoroughly and let it air dry completely. Keeping your hairbrush clean promotes a healthy scalp and ensures your hair stays fresh and tangle-free. Regular maintenance is key for optimal hairbrush performance.
Importance Of Cleaning Hairbrushes
Cleaning your hairbrush is essential for maintaining good hygiene and promoting hair health. Regularly removing lint and debris ensures your hairbrush works effectively and lasts longer.
Hygiene Benefits
Keeping your hairbrush clean helps prevent the buildup of bacteria and germs. A dirty hairbrush can transfer these to your scalp, causing infections and irritation.
Regular cleaning also removes dead skin cells and oils. This prevents unpleasant odors and keeps your hairbrush fresh.
Here are some key hygiene benefits of cleaning your hairbrush:
- Prevents bacterial growth
- Reduces scalp irritation
- Eliminates bad odors
- Removes dead skin cells
Hair Health
A clean hairbrush ensures your hair stays healthy and shiny. Removing lint and debris prevents hair breakage and split ends.
Clean hairbrushes distribute natural oils more evenly. This keeps your hair moisturized and reduces frizz.
To summarize, here are the hair health benefits of a clean hairbrush:
| Benefits | Details |
|---|---|
| Prevents Hair Breakage | Removes lint and debris that cause damage |
| Even Oil Distribution | Keeps hair moisturized and reduces frizz |
| Promotes Shine | Maintains natural hair luster |
Following these simple tips ensures your hairbrush remains clean. This promotes better hygiene and healthier hair.
Common Sources Of Lint
Lint in your hairbrush can be annoying. Understanding where it comes from helps. Lint can come from many places. Knowing the sources makes cleaning easier. Let’s explore some common sources of lint.
Environmental Factors
Dust and dirt from the air can settle on your hairbrush. Wind can carry small particles. These particles stick to the bristles. Your surroundings play a big role too. Living in a dry area can increase lint.
Pet hair is another culprit. If you have pets, their hair can mix with lint. This makes your brush dirty faster.
Product Residue
Hair products can leave residue on your brush. These include gels, sprays, and oils. The residue attracts lint. This makes your brush sticky and dirty.
Conditioners and shampoos can also contribute. These products can build up over time. This build-up attracts dust and lint. Cleaning your brush regularly helps reduce residue.
| Source | Description |
|---|---|
| Dust and Dirt | Particles from the air and surroundings |
| Pet Hair | Hair from pets mixing with lint |
| Hair Products | Residue from gels, sprays, and oils |
| Shampoos and Conditioners | Build-up from these products over time |
Tools You’ll Need
Keeping your hairbrush clean is essential for hair health. Removing lint can seem daunting, but with the right tools, it’s simple. Let’s explore the tools you’ll need for this task.
Basic Supplies
- Comb: A fine-tooth comb helps dislodge lint.
- Toothpick: Use a toothpick to reach tight spots.
- Small Scissors: Cut away stubborn lint.
- Bowl of Warm Water: Soak the brush to loosen debris.
- Mild Shampoo: Clean your brush with gentle shampoo.
Optional Add-ons
- Old Toothbrush: Scrub the base with an old toothbrush.
- Vinegar: Disinfect your brush with vinegar.
- Tweezers: Pluck out stubborn lint pieces.
- Dry Towel: Dry your brush with a clean towel.
These tools make cleaning your hairbrush easy and effective. Using them regularly ensures your brush stays lint-free and ready for use.
Pre-cleaning Steps
Before diving into the actual cleaning process, it’s crucial to prepare your hairbrush. These pre-cleaning steps will make the main cleaning task easier and more effective. Follow these simple steps to ensure your hairbrush is ready for a thorough clean.
Remove Hair
First, you need to remove all hair from the brush. This is essential to prevent further tangling. Use your fingers or a comb to pull out the hair strands. If the hair is too tangled, use scissors to cut through the knots.
To make this task easier, you can use a pair of tweezers. This will help you grab small, stubborn hairs. Removing the hair ensures a cleaner and smoother brush.
Disassemble Parts
Next, it’s important to disassemble any detachable parts of your hairbrush. This step is crucial for a deep clean. Check if the brush head or handle can be separated. If so, gently pull them apart.
Place the parts on a clean surface. This will allow you to clean each part individually, ensuring no area is missed. Keeping the parts separate also helps in drying them more efficiently.
If your brush has a cushioned pad, remove it carefully. This pad often traps lint and dirt. Disassembling your brush ensures every part gets the attention it needs.
| Step | Description |
|---|---|
| Remove Hair | Use fingers, comb, or tweezers to remove hair strands. |
| Disassemble Parts | Separate brush head, handle, and cushioned pad if possible. |
Dry Cleaning Methods
Lint in hairbrushes can be very annoying. Dry cleaning methods work well. They do not require water. This keeps your hairbrush dry and ready for use.
Using A Comb
Start with a small, fine-toothed comb. Gently run the comb through the bristles of the hairbrush. The comb will catch the lint. Pull the lint out with your fingers. Repeat this process until the brush is clean.
| Steps | Action |
|---|---|
| 1 | Grab a fine-toothed comb |
| 2 | Run it through the bristles |
| 3 | Remove lint with fingers |
| 4 | Repeat until clean |
Sticky Tape Technique
Sticky tape can also help. Take a piece of tape. Wrap it around your fingers with the sticky side out. Press the tape onto the bristles. The lint will stick to the tape. Peel
Wet Cleaning Techniques
Wet cleaning techniques are highly effective for removing lint from hairbrushes. These methods ensure thorough cleaning and help maintain the hygiene of your hairbrush. Let’s dive into some of the most efficient wet cleaning techniques.
Soaking In Water
Soaking your hairbrush in water is a simple yet effective method. Follow these steps to get the best results:
- Fill a bowl with warm water.
- Submerge the hairbrush in the water.
- Let it soak for 15-20 minutes.
- Use an old toothbrush to scrub between the bristles.
- Rinse the brush under running water.
- Dry it with a clean towel.
Soaking helps loosen and remove lint trapped in the bristles. It also softens any stubborn dirt or product buildup.
Using Soap Solutions
Soap solutions are excellent for a deeper clean. Here’s how you can do it:
- Mix warm water with a few drops of dish soap.
- Immerse the hairbrush in the soapy water.
- Allow it to soak for 10-15 minutes.
- Use a toothbrush to scrub the bristles gently.
- Rinse thoroughly under warm water.
- Blot excess water with a towel and let it air dry.
Using soap helps break down oils and residue, ensuring a cleaner hairbrush. This method is suitable for removing both lint and buildup.
Here’s a quick comparison of both methods:
| Method | Duration | Effectiveness |
|---|---|---|
| Soaking in Water | 15-20 minutes | Good for lint removal |
| Using Soap Solutions | 10-15 minutes | Excellent for lint and residue |
These wet cleaning techniques keep your hairbrush clean and extend its life. Regular cleaning ensures your hair remains healthy and free from dirt and lint.
Drying And Reassembling
After removing lint from your hairbrush, it’s important to dry and reassemble it correctly. Proper drying prevents mold, while reassembly ensures your brush works well. Let’s dive into the steps for drying and reassembling your hairbrush.
Air Drying Tips
Place your hairbrush on a clean, dry towel. Make sure the bristles face down. This helps water drain away from the base.
Choose a well-ventilated area for drying. Avoid direct sunlight as it can damage the bristles.
Allow your hairbrush to air dry completely. This usually takes around 12 to 24 hours.
| Drying Method | Benefits |
|---|---|
| Air Drying | Prevents mold and bacteria |
| Towel Drying | Quickens the drying process |
Reassembly Instructions
Once your hairbrush is completely dry, start reassembling. Begin by placing the bristle pad back into the brush body. Make sure it fits snugly.
Next, attach any removable parts, like the handle or cushion. Double-check to ensure everything is secure.
Finally, give your hairbrush a gentle shake. This ensures all parts are firmly in place and ready for use.
- Place the bristle pad back into the brush body.
- Attach removable parts securely.
- Shake gently to check for secure assembly.
Following these steps ensures your hairbrush stays clean and lasts longer. Proper care makes your hair look its best.
Maintenance Tips
Maintaining your hairbrush is essential for keeping it lint-free and effective. Regular upkeep prevents lint build-up and extends the life of your brush. Here are some practical maintenance tips to follow.
Regular Cleaning Schedule
Set a regular cleaning schedule for your hairbrush to keep it in top shape. Clean your brush weekly to remove hair and lint.
- Weekly Cleaning: Remove all hair from the brush. Use a comb to pull out the trapped hair.
- Monthly Deep Clean: Soak the brush in warm, soapy water. Use an old toothbrush to scrub the base and bristles.
Preventive Measures
Preventive steps help avoid lint accumulation on your hairbrush.
- Store Properly: Keep your hairbrush in a clean, dry place. Avoid leaving it on fabric surfaces.
- Cover the Brush: Use a plastic cover to protect the bristles from dust and lint.
- Use Clean Hair Products: Ensure your hair products are lint-free. Avoid using products that leave residues.
Frequently Asked Questions
How Do I Remove Lint From Hairbrush?
Use a fine-toothed comb to dislodge lint. Wash the brush in warm soapy water for thorough cleaning.
Can Vinegar Help Clean My Hairbrush?
Yes, soak the brush in a mixture of vinegar and water. This helps dissolve and remove lint effectively.
What Tools Are Best For Lint Removal?
A fine-toothed comb or an old toothbrush works well. They help dislodge lint from bristles.
How Often Should I Clean My Hairbrush?
Clean your hairbrush once a week. Regular cleaning prevents lint buildup and maintains hygiene.
Is It Safe To Use A Dryer Sheet?
Yes, rubbing a dryer sheet on the brush can reduce static. This helps in preventing lint from sticking.
Conclusion
Cleaning lint from your hairbrush can be simple and effective. Regular maintenance keeps your brush in top condition. Use these easy steps to ensure your brush stays clean and functional. Say goodbye to lint and hello to smooth, tangle-free hair.
Enjoy the benefits of a well-maintained hairbrush every day.