Table of Contents
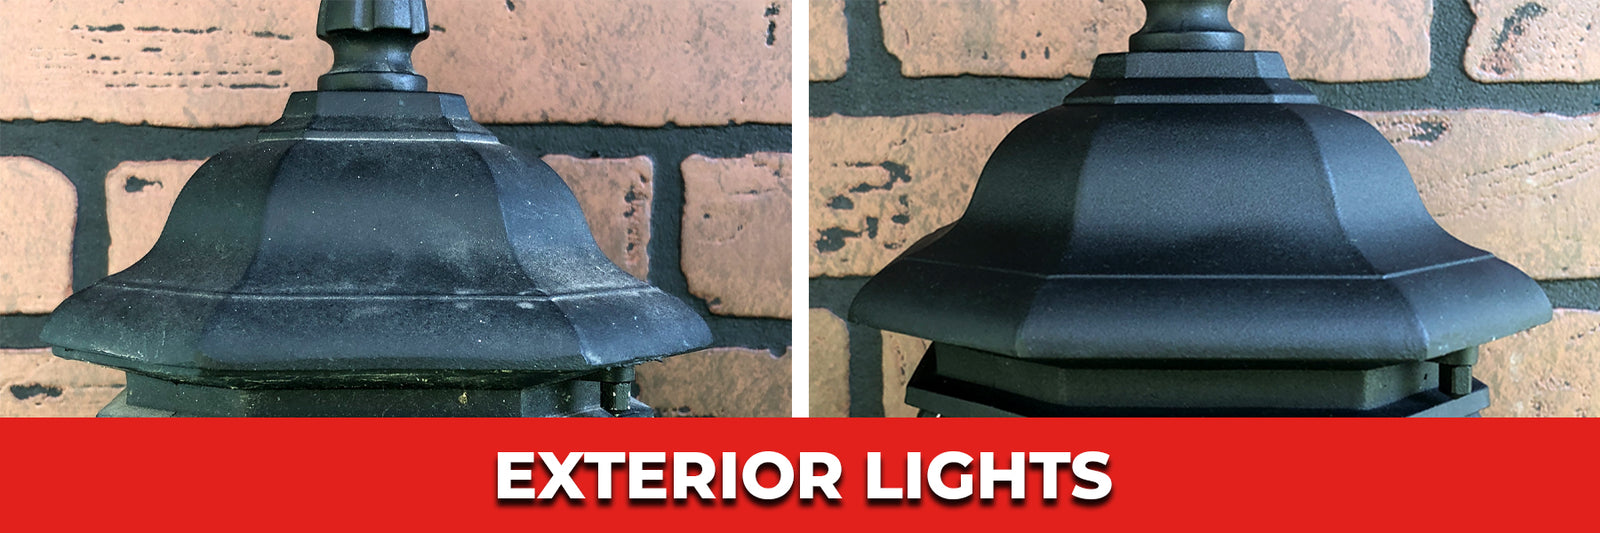
Oxidized outdoor light fixtures look dull and unattractive. They can ruin the appearance of your home.
Cleaning these fixtures may seem tough, but it is easier than you think. Over time, outdoor lights gather dirt, grime, and oxidation. This makes them look old and worn out. Regular cleaning can bring back their shine and extend their life.
With a few simple steps, you can have your outdoor lights looking new again. This guide will show you how to clean oxidized outdoor light fixtures effectively. Follow along to learn the best methods and tips to restore their original beauty.
Materials Needed
To effectively clean oxidized outdoor light fixtures, gather all necessary materials. Having the right materials ensures a smooth and efficient cleaning process. This section outlines the essential cleaning solutions, tools, and equipment required.
Cleaning Solutions
Using the right cleaning solutions is crucial for removing oxidation. Here are some effective options:
- Vinegar and Water: Mix equal parts of vinegar and water. This solution is gentle yet effective.
- Lemon Juice: Apply fresh lemon juice. The acidity helps break down oxidation.
- Baking Soda Paste: Combine baking soda and water to form a paste. This works well for scrubbing.
- Commercial Metal Cleaner: Use a cleaner designed specifically for metal surfaces.
Tools And Equipment
Gather the necessary tools and equipment to make the cleaning process easier. Here are the essentials:
| Tool/Equipment | Purpose |
|---|---|
| Soft Cloths | Wiping and drying surfaces |
| Soft-Bristle Brush | Scrubbing hard-to-reach areas |
| Toothbrush | Cleaning intricate details |
| Bucket | Holding cleaning solutions |
| Gloves | Protecting hands from chemicals |
Using these materials ensures your outdoor light fixtures will look as good as new. Proper preparation is key for a successful cleaning session.
Preparation Steps
Gather cleaning supplies like water, vinegar, and a soft cloth. Turn off the power to the light fixtures.
Cleaning oxidized outdoor light fixtures requires some preparation. Proper planning ensures the task is safe and efficient. Follow these steps to get started.
Safety Precautions
Safety is crucial. Turn off the power to the light fixtures. Use a circuit breaker to cut the electricity. This prevents any risk of electric shock. Wear rubber gloves for added protection. Use a sturdy ladder if the fixtures are high. Ensure the ladder is on a stable surface. Have someone hold the ladder for extra safety.
Gathering Supplies
Gather all the necessary supplies beforehand. You will need a soft cloth and a bucket. Have mild soap or a cleaning solution ready. Use a soft-bristle brush for scrubbing. Get white vinegar for stubborn oxidation. Have a spray bottle for easy application. Keep a clean, dry cloth for drying the fixtures. This preparation ensures you have everything you need at hand.
“`
Removing The Fixture
Oxidized outdoor light fixtures can ruin the look of your home. Removing the fixture is the first step in cleaning and restoring it. It’s important to follow safety precautions and handle the fixture with care. Below are the steps for safely removing the fixture.
Turning Off Power
Before you begin, turn off the power to the light fixture. Go to your home’s electrical panel. Find the switch that controls the outdoor light fixture. Flip the switch to the “off” position. This step is crucial to avoid any electric shock.
Detaching The Fixture
Once the power is off, you can detach the fixture. Use a screwdriver to remove the screws holding the fixture to the wall. Carefully pull the fixture away from the wall. You will see wires connected to the fixture. Use a voltage tester to ensure no current is present.
If the tester shows no current, disconnect the wires. Unscrew the wire nuts and separate the fixture wires from the house wires. Keep track of how the wires are connected. This will help you when reattaching the fixture later. Now, you can safely remove the fixture and start cleaning it.
Cleaning The Fixture
Outdoor light fixtures can lose their shine due to oxidation. Regular cleaning helps maintain their look and function. This guide will help you clean your oxidized outdoor light fixtures step-by-step.
Applying Cleaning Solution
First, gather your supplies. You will need a gentle cleaning solution, a soft cloth, and a bucket of warm water. Mix the cleaning solution with water according to the instructions on the bottle. Dip the cloth into the solution and wring out the excess liquid.
Next, apply the solution to the fixture. Be sure to cover all areas, including any small crevices. Allow the solution to sit for a few minutes. This loosens the dirt and oxidation.
Scrubbing Away Oxidation
After the solution has had time to work, use a soft brush to scrub the fixture. Focus on areas with heavy oxidation. Use small circular motions to avoid scratching the surface. For stubborn spots, you may need to apply more solution and scrub again.
Finally, rinse the fixture with clean water. Ensure all cleaning solution is removed. Dry the fixture with a clean, soft cloth to prevent water spots.
| Supplies Needed | Steps |
|---|---|
| Cleaning solution | Mix with water |
| Soft cloth | Apply solution to fixture |
| Soft brush | Scrub away oxidation |
| Warm water | Rinse thoroughly |
| Clean cloth | Dry the fixture |
Rinsing And Drying
Proper rinsing and drying of your oxidized outdoor light fixtures are essential. It ensures they look their best and last longer. This section will guide you through effective rinsing techniques and how to dry the fixtures properly.
Proper Rinsing Techniques
Start by rinsing the light fixture with clean water. Use a garden hose with a gentle spray setting. Ensure you remove all loose dirt and debris. Avoid using high-pressure settings to prevent damage. For stubborn grime, use a soft sponge or cloth. Dip it in soapy water and gently scrub the affected areas. Rinse the fixture again to wash away any soap residue. Ensure the fixture is thoroughly cleaned before moving on to the drying step.
Drying The Fixture
After rinsing, drying the fixture is crucial. Use a clean, dry cloth to wipe down the surface. Ensure you remove all excess water to prevent further oxidation. Pay extra attention to crevices and joints where water may collect. Allow the fixture to air dry completely. This step ensures no moisture remains, which could lead to future oxidation. Once dry, your outdoor light fixture will look refreshed and ready to use.
Reassembling The Fixture
Reassemble the fixture carefully after cleaning. Ensure all parts are dry before putting them back together. This prevents further oxidation.
After cleaning and drying your outdoor light fixture, it’s time to reassemble it. Proper reassembly ensures that your fixture functions correctly and looks great. Follow these steps to put everything back together safely and effectively.
Reattaching The Fixture
First, gather all the parts you removed earlier. Make sure they are completely dry. Align the fixture parts as they were before disassembly. Hold the main body of the fixture in place. Use screws or bolts to secure it to the wall or post. Tighten them until the fixture is firmly attached. Avoid over-tightening to prevent damage.
Next, reattach any glass or plastic covers. These covers protect the bulb from weather elements. Slide them into place carefully. Secure them with any screws or clips provided. Make sure the covers are snug and secure.
Turning On Power
Now, it’s time to restore power to the fixture. Go back to your circuit breaker or fuse box. Find the switch that controls the outdoor light. Flip the switch to the “on” position. Return to your outdoor light fixture. Test the light by turning it on with its switch.
Observe the fixture. Ensure it lights up properly without flickering. Check for any unusual sounds or issues. If everything looks good, your fixture is ready for use. Enjoy the clean and bright light that enhances your outdoor space.
“`
Maintenance Tips
Maintaining your outdoor light fixtures can keep them looking new and extend their life. Proper care helps prevent oxidation and ensures your fixtures shine brightly. Here are some essential tips to help you maintain your outdoor light fixtures effectively.
Regular Cleaning Schedule
Set a regular cleaning schedule to keep your outdoor light fixtures free from dirt and grime. A monthly cleaning routine works best for most fixtures.
- Dust the fixtures with a soft cloth or brush.
- Use a mild soap and water solution for stubborn dirt.
- Rinse with clean water and dry thoroughly with a soft cloth.
Regular cleaning prevents the buildup of dirt and moisture, which can lead to oxidation.
Preventing Future Oxidation
Preventing oxidation is crucial to maintaining the look and function of your outdoor light fixtures. Follow these steps to protect them:
- Apply a protective coating – Use a clear coat spray or wax to seal the surface.
- Keep fixtures dry – Ensure water drains away from the fixtures to avoid standing water.
- Use corrosion-resistant materials – Opt for fixtures made of stainless steel or brass.
By taking these steps, you can significantly reduce the risk of oxidation and keep your fixtures in top condition.
Frequently Asked Questions
What Causes Outdoor Light Fixtures To Oxidize?
Outdoor light fixtures oxidize due to exposure to moisture, air, and harsh weather conditions.
How Can I Remove Oxidation From Outdoor Light Fixtures?
Use a mixture of vinegar and water. Scrub gently with a soft brush.
What Tools Do I Need To Clean Oxidized Light Fixtures?
You need vinegar, water, a soft brush, and a clean cloth.
How Often Should I Clean Outdoor Light Fixtures?
Clean your outdoor light fixtures every six months to keep them looking new.
Can I Prevent Outdoor Light Fixtures From Oxidizing?
Yes, apply a protective sealant to prevent moisture and air from causing oxidation.
Conclusion
Maintaining your outdoor light fixtures helps them last longer. Clean them regularly to prevent oxidation. Use simple tools and safe cleaning methods. Your lights will look new and work better. Take a few minutes each month for upkeep. This small effort will save you money and time.
Bright, clean lights enhance your home’s curb appeal. Keep your outdoor space welcoming and well-lit. Happy cleaning!