Table of Contents
To clean a gas tank that has been sitting, first drain the old fuel. Then, remove and clean the tank thoroughly.
Cleaning a gas tank that has been sitting for a long time is crucial for optimal engine performance. Old fuel can lead to clogs, rust, and contamination, which harm your engine. Start by draining any remaining fuel to prevent further damage.
Once emptied, remove the tank and clean it with a recommended solvent or a mixture of soap and water. Scrub the interior to eliminate residue, rust, and debris. Ensure the tank is completely dry before reinstallation. This process helps maintain a clean fuel system, extending the lifespan of your engine and improving efficiency. Regular maintenance can save you from costly repairs.
Gather Necessary Supplies
Cleaning a gas tank that has been sitting for a long time can seem daunting. But, with the right supplies and safety gear, it becomes manageable. This section will guide you on gathering the necessary supplies to get started.
Tools Needed
Having the right tools is essential for cleaning a gas tank effectively. Below is a list of tools you will need:
- Wrenches – for removing the gas tank.
- Screwdrivers – to open any screws or bolts.
- Fuel Line Clamp – to close off the fuel line.
- Bucket or Container – to hold the old gas.
- Cleaning Brush – to scrub the inside of the tank.
- High-Pressure Water Hose – for rinsing the tank.
- Compressed Air – to dry the tank quickly.
Safety Gear
Safety should always be a priority. Make sure you have the following safety gear:
- Gloves – to protect your hands from chemicals.
- Safety Goggles – to shield your eyes from splashes.
- Face Mask – to avoid inhaling fumes.
- Protective Clothing – to keep your body safe.
Proper safety gear ensures you stay safe while cleaning the gas tank.
Drain The Gas Tank
Draining the gas tank is the first step to clean it. Old fuel can cause many problems. It’s important to remove it properly. Follow these steps to ensure a clean and safe process.
Remove Old Fuel
First, make sure your vehicle is in a safe location. Use a siphon pump to remove the old fuel. Insert the siphon hose into the tank. Pump until the tank is empty. Be careful not to spill any fuel. This step is crucial to avoid contamination.
Dispose Of Fuel Properly
Old fuel is hazardous. Dispose of it properly to protect the environment. Find a local disposal facility. They can handle hazardous materials. Never pour fuel down drains or on the ground. Use a sealed container to transport the old fuel.
| Step | Action |
|---|---|
| 1 | Place vehicle in a safe location |
| 2 | Use a siphon pump to remove old fuel |
| 3 | Transfer old fuel to a sealed container |
| 4 | Take fuel to a disposal facility |
Following these steps ensures your gas tank is ready for cleaning. Proper disposal protects you and the environment.
Remove The Gas Tank
Removing the gas tank is the first step to cleaning it properly. It ensures you can thoroughly inspect and clean the tank. Follow these steps to safely remove the gas tank.
Preparation Steps
Before starting, ensure you have the necessary tools and equipment. Here are the preparation steps:
- Park the vehicle in a well-ventilated area.
- Disconnect the car battery to avoid sparks.
- Gather tools like wrenches, a jack, and a fuel siphon pump.
- Wear protective gloves and goggles for safety.
Tank Removal Process
Follow these steps to remove the gas tank:
- Drain the fuel: Use a fuel siphon pump to empty the tank.
- Raise the vehicle: Use a jack to lift the car. Secure it with jack stands.
- Locate the gas tank: Find the tank underneath the vehicle.
- Disconnect fuel lines: Carefully detach the fuel lines from the tank.
- Remove mounting bolts: Use a wrench to unscrew the bolts holding the tank.
- Lower the tank: Gently lower the tank and remove it from the vehicle.
Follow these steps to safely remove the gas tank. This ensures it’s ready for cleaning.
Inspect The Tank
Cleaning a gas tank that has been sitting requires careful inspection. The inspection ensures the tank is safe and ready for cleaning. This step is crucial to identify any potential issues. Inspect the tank thoroughly before proceeding with the cleaning process.
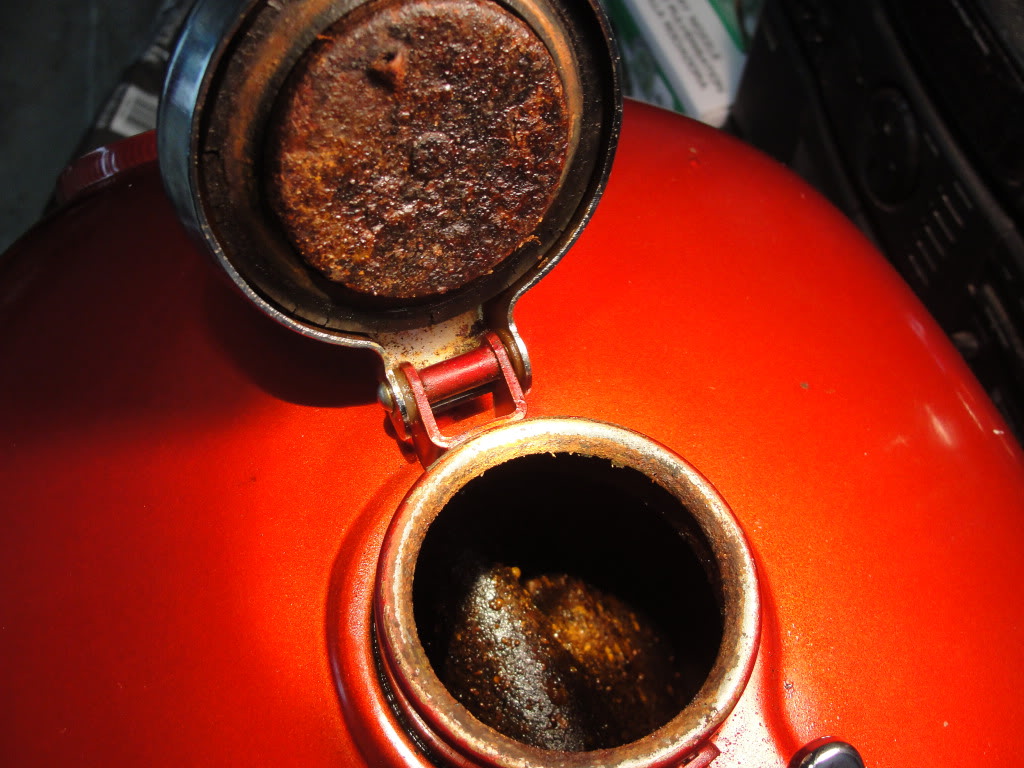
Check For Rust
Rust is a common problem in gas tanks that have been sitting. Use a flashlight to check the inside of the tank. If you see any rust spots, note them down. Rust can weaken the tank and cause leaks. You may need to treat the rust before cleaning the tank.
Look For Debris
Debris can accumulate in a gas tank over time. Check the tank for any debris like dirt, leaves, or small rocks. Use a stick or tool to gently move the debris. Remove any large pieces you find. Smaller particles can be cleaned later during the washing process.
| Inspection Task | Why It’s Important |
|---|---|
| Check for Rust | Rust can cause leaks and weaken the tank. |
| Look for Debris | Debris can clog the fuel system. |
Inspecting the tank ensures you address potential problems. It helps prepare the tank for effective cleaning.
Clean The Interior
Cleaning the interior of a gas tank that has been sitting is crucial. Over time, debris, rust, and old fuel residues accumulate. This can cause major issues for your engine. Follow these steps to ensure a thorough cleaning.
Use Cleaning Solution
First, you need a proper cleaning solution. Choose a solution designed for gas tanks. These solutions dissolve rust, sludge, and varnish. Pour the solution into the tank. Ensure it covers all interior surfaces. Let it sit for the recommended time.
Scrub And Rinse
After the solution has soaked, it’s time to scrub. Use a brush with a long handle. Scrub the interior walls of the tank. Focus on areas with heavy buildup.
Next, rinse the tank thoroughly. Use clean water to remove all residues. Make sure no cleaning solution remains. Repeat the rinsing process if necessary.
| Step | Description |
|---|---|
| 1. Add Cleaning Solution | Pour the solution into the tank and let it sit. |
| 2. Scrub Interior | Use a brush to scrub the tank walls. |
| 3. Rinse Thoroughly | Rinse the tank with clean water. |
Follow these steps to keep your gas tank clean. Regular maintenance will ensure your engine runs smoothly.
Dry The Tank
Drying the gas tank is a crucial step in the cleaning process. Any remaining moisture can cause rust and contamination. Proper drying ensures the tank remains clean and functional.
Air Drying Methods
One simple way to dry a gas tank is to use air drying methods. These are easy and effective:
- Place the tank in a sunny spot. Let the sun do the work.
- Position the tank in a well-ventilated area. Allow the air to circulate.
- Use a fan to speed up the drying process. Point it directly at the tank opening.
Air drying is effective but may take some time. Be patient for best results.
Use Of Heat Gun
For faster drying, use a heat gun. This method is quicker and efficient:
- Set the heat gun to a low setting. Avoid high temperatures to prevent damage.
- Hold the gun at a safe distance. Keep moving it around the tank.
- Ensure even heat distribution. Focus on damp areas.
Using a heat gun saves time and ensures a thorough dry.
Important Tip: Always ensure the tank is completely dry before reassembling. A dry tank prevents rust and maintains fuel quality.
Reinstall The Gas Tank
Once you have cleaned your gas tank, it’s time to reinstall it. This step is crucial to ensure your vehicle runs smoothly. Follow these guidelines carefully to avoid any issues.
Reattachment Steps
To reattach the gas tank, follow these simple steps:
- Lift the tank back into position.
- Align the tank with the mounting brackets.
- Secure the tank using bolts and screws.
- Reconnect fuel lines and electrical connections.
Make sure all connections are tight. This will prevent any fuel leaks. Double-check the fuel lines for secure attachment. Use a wrench to tighten bolts properly.
Testing For Leaks
After reattaching the gas tank, it’s important to test for leaks:
- Fill the tank with a small amount of fuel.
- Inspect the tank and connections for any signs of leakage.
- If you find leaks, tighten the connections again.
Safety Tip: Always work in a well-ventilated area. Avoid open flames and sparks.
Testing ensures your gas tank is secure and safe. Keep an eye on the tank over the next few days. This will help you spot any slow leaks early.
Prevent Future Issues
Cleaning a gas tank that has been sitting idle is crucial. It prevents future complications. Regular maintenance keeps your vehicle in top shape. Using fuel stabilizers helps too. Below are some tips to maintain your gas tank.
Regular Maintenance Tips
- Inspect the tank monthly: Check for rust, dirt, and water.
- Keep it full: A full tank reduces condensation inside.
- Use high-quality fuel: Good fuel keeps your tank clean.
- Drain the tank: Empty the tank yearly to avoid sediment build-up.
- Replace the fuel filter: Change the filter every 15,000 miles.
Fuel Stabilizers
Fuel stabilizers are essential for a gas tank. They prevent fuel from degrading. Degraded fuel clogs the fuel system. Using stabilizers ensures smooth engine performance.
| Brand | Benefits |
|---|---|
| STA-BIL | Prevents corrosion, keeps fuel fresh for 24 months. |
| Sea Foam | Cleans injectors, lubricates upper cylinders. |
| Star Tron | Reduces emissions, stabilizes fuel for 2 years. |
Always follow the manufacturer’s instructions. Add the stabilizer when you fill your tank. This ensures even mixing. Proper use of stabilizers extends your fuel’s life. It protects your engine and fuel system.
Frequently Asked Questions
How Do I Clean A Gas Tank?
Drain the old fuel, remove the tank, and rinse with a fuel-safe cleaner.
What Tools Are Needed To Clean A Gas Tank?
You need a siphon pump, fuel-safe cleaner, and a brush.
Can Vinegar Be Used To Clean A Gas Tank?
Yes, vinegar removes rust and residue effectively from gas tanks.
How Long Should A Gas Tank Soak?
Let the gas tank soak for at least 24 hours for best results.
Is It Safe To Clean A Gas Tank At Home?
Yes, ensure proper ventilation and follow safety guidelines.
Conclusion
Cleaning a gas tank that has been sitting is crucial for vehicle maintenance. Follow these steps to ensure efficiency. Regular cleaning prevents clogs and extends engine life. Always use proper safety gear and dispose of old fuel responsibly. With these tips, keep your gas tank in top condition effortlessly.